User Guide
Ever forget a deadline? Or lost track of your customers? Many commission-based artists struggle to organise their business. With so many things to keep track of, you might have found yourself wondering if there were a better way to manage all of these.
That’s why we built ArtBuddy (AB), a commission-based artist’s best buddy, just for you. Developed with your needs in mind, ArtBuddy is here to help you manage all your customers and commissions in one place. But that’s not all. With integrated support for tracking the progress of your commissions through iterations, and generation of statistics, ArtBuddy is also here to help you grow as an artist.
So, focus on your art and leave the rest to ArtBuddy.
Just getting started with ArtBuddy? We recommend you check out the Using this guide section to. Eager to get started? You can refer to our Quick Start section to set ArtBuddy up, or you can jump right into our Features section to learn more about the features ArtBuddy offers.
Table of Contents
- Table of Contents
- Using this guide
- Introduction
- Quick start
- Features
- Appendix
- Glossary
- FAQ
- Command summary
Using this guide
This guide walks you through all the features of ArtBuddy and can be used as a quick reference whenever you need any help.
If you’re just getting started with ArtBuddy, we welcome you to start from our Introduction section to learn more about ArtBuddy. Or, if you’re eager to hop right into setting up ArtBuddy, you might find the Quick Start section helpful.
Already set up ArtBuddy? You can check out our Features section. For ease of reference, the Features section is divided into subsections corresponding to each main feature: Customers, Commissions, Iterations and Statistics. Feel free to jump around as you explore ArtBuddy’s amazing features!
You can also refer to our Table of Contents to navigate between the different sections of this guide.
Conventions used in this guide
Formatting conventions
As you read through this guide, you might come across text with special formatting. These specially formatted
text hold meaning, as described below.
| Description | |
|---|---|
code |
ArtBuddy commands appear in a monospaced font, with a grey background, as shown on the left. To learn more about ArtBuddy commands, refer to the CLI section. |
CODE_UPPER_CASE |
Certain ArtBuddy commands contain words appear in upper case. These refer to parameters (user input) to be supplied to ArtBuddy. |
code_italics |
ArtBuddy commands may also contain words that appear in italics. These refer to example command parameters, which you can replace with your own inputs. |
| blue hyperlink | Hyperlinks appear in a blue font that is underlined when hovered over by your mouse. These hyperlinks bring you to another section of the user guide containing more relevant information to the topic. |
| Bold Title Case | References to elements in ArtBuddy’s GUI (like buttons and text field labels) are formatted in bold, in Title Case. |
Conventions used in command formats
When talking about ArtBuddy command formats, we’ve adopted the following conventions to make explanations
more succinct. If you’re not familiar with ArtBuddy’s CLI, you might want to look at our
ArtBuddy’s CLI section to learn more.
| Description | Example | |
|---|---|---|
| Optional command parameters | Certain ArtBuddy commands have optional command parameters. These command parameters may be specified, or be left out. You’ll be able to identify optional command parameters as they will appear around square brackets when specified in the command format. | For instance, the command format of the Add Customer command is addcus n/NAME p/PHONE_NUMBER e/EMAIL [a/ADDRESS] [t/TAG].... Notice that the address and tag command parameters appear around square brackets? That just means that you can choose whether to specify these command parameters! |
| Command parameters that can be specified more than once | You may also notice that certain command have ... after certain command parameters. This simply means indicates that the input parameter be used multiple times (including zero times). |
Following the example of the Add Customer example above, where you’ll notice the tag command parameter [t/TAG]... is followed by ..., this just means that the tag command input can be specified any number of times! |
Call-out text box conventions
You might also notice call-out text boxes in this guide. These contain additional information tidbits that might be useful
for you.
Introduction
Made for commission-based artists, ArtBuddy is the easiest way to organise your customers and commissions. Powerful features and intuitive design, all packaged into one neat desktop app. ArtBuddy is supported on all major operating systems (Windows, macOS, Linux).
Let ArtBuddy help you…
-
Manage your customers
ArtBuddy lets you store, edit and delete your customer’s information. Consolidate all your customer’s contact details, so you never have to lose a contact again. -
Take charge of your commissions
Add commissions to a customer in ArtBuddy, just like in real life! ArtBuddy can store your commission details, like fees, deadlines, and completion statuses. Easily update and delete commissions as you wish. -
Keep track of your progress
ArtBuddy wants you help you hone your craft, and learning from yourself is a critical part of that. With ArtBuddy, keep track of the progress of your commissions using iterations. Each iteration is simply a version of your artwork. Learn from feedback and your past work, so you can continuously improve your craft. -
Supercharge your business
Learn where your highest sales are coming from by leveraging on the powerful statistics ArtBuddy offers so that you can accelerate your business growth.
Getting things done fast
We get that your time is precious. So spend it on what you love doing, your art, and let ArtBuddy handle the rest. With optimised support for use via a Command Line Interface (CLI), ArtBuddy can help you manage your small business at the speed of your fingertips.
Not sure what a CLI is? Don’t worry! It’s easy to pick up, you can even refer to our short introduction to ArtBuddy’s CLI to learn more.
More of a visual person? Don’t sweat it! Unlike many CLI applications, ArtBuddy still has a sleek, intuitive Graphical User Interface (GUI). This means that you can also interact with ArtBuddy using visual controls like buttons and pop-ups. There’s something for everyone!
Quick start
Let’s get you started with ArtBuddy! This section will help you get oriented with ArtBuddy, from installation to a quick tutorial. Users already experienced with CLI might want to skip over the CLI section. So, what are you waiting for? Let’s go, go, go!
Installation instructions
Starting up ArtBuddy
Starting up ArtBuddy (on macOS)
Getting familiar with ArtBuddy’s interface
ArtBuddy’s CLI
Quick tutorial
Installation instructions
Don’t have ArtBuddy installed on your computer yet? Check out our step-by-step installation instructions to download ArtBuddy.
- ArtBuddy is written in the programming language Java, so you’ll need Java 11 or above installed in your computer
to run ArtBuddy.
- Not sure if you have a compatible Java version installed on your computer? Windows or macOS users might find this guide useful. While Linux users can refer to this guide.
- Don’t have a compatible Java version installed? Fret not, Java is free to install! Complete installation instructions can be found here.
- Download the latest version of ArtBuddy by downloading the
artbuddy.jarfile found here.
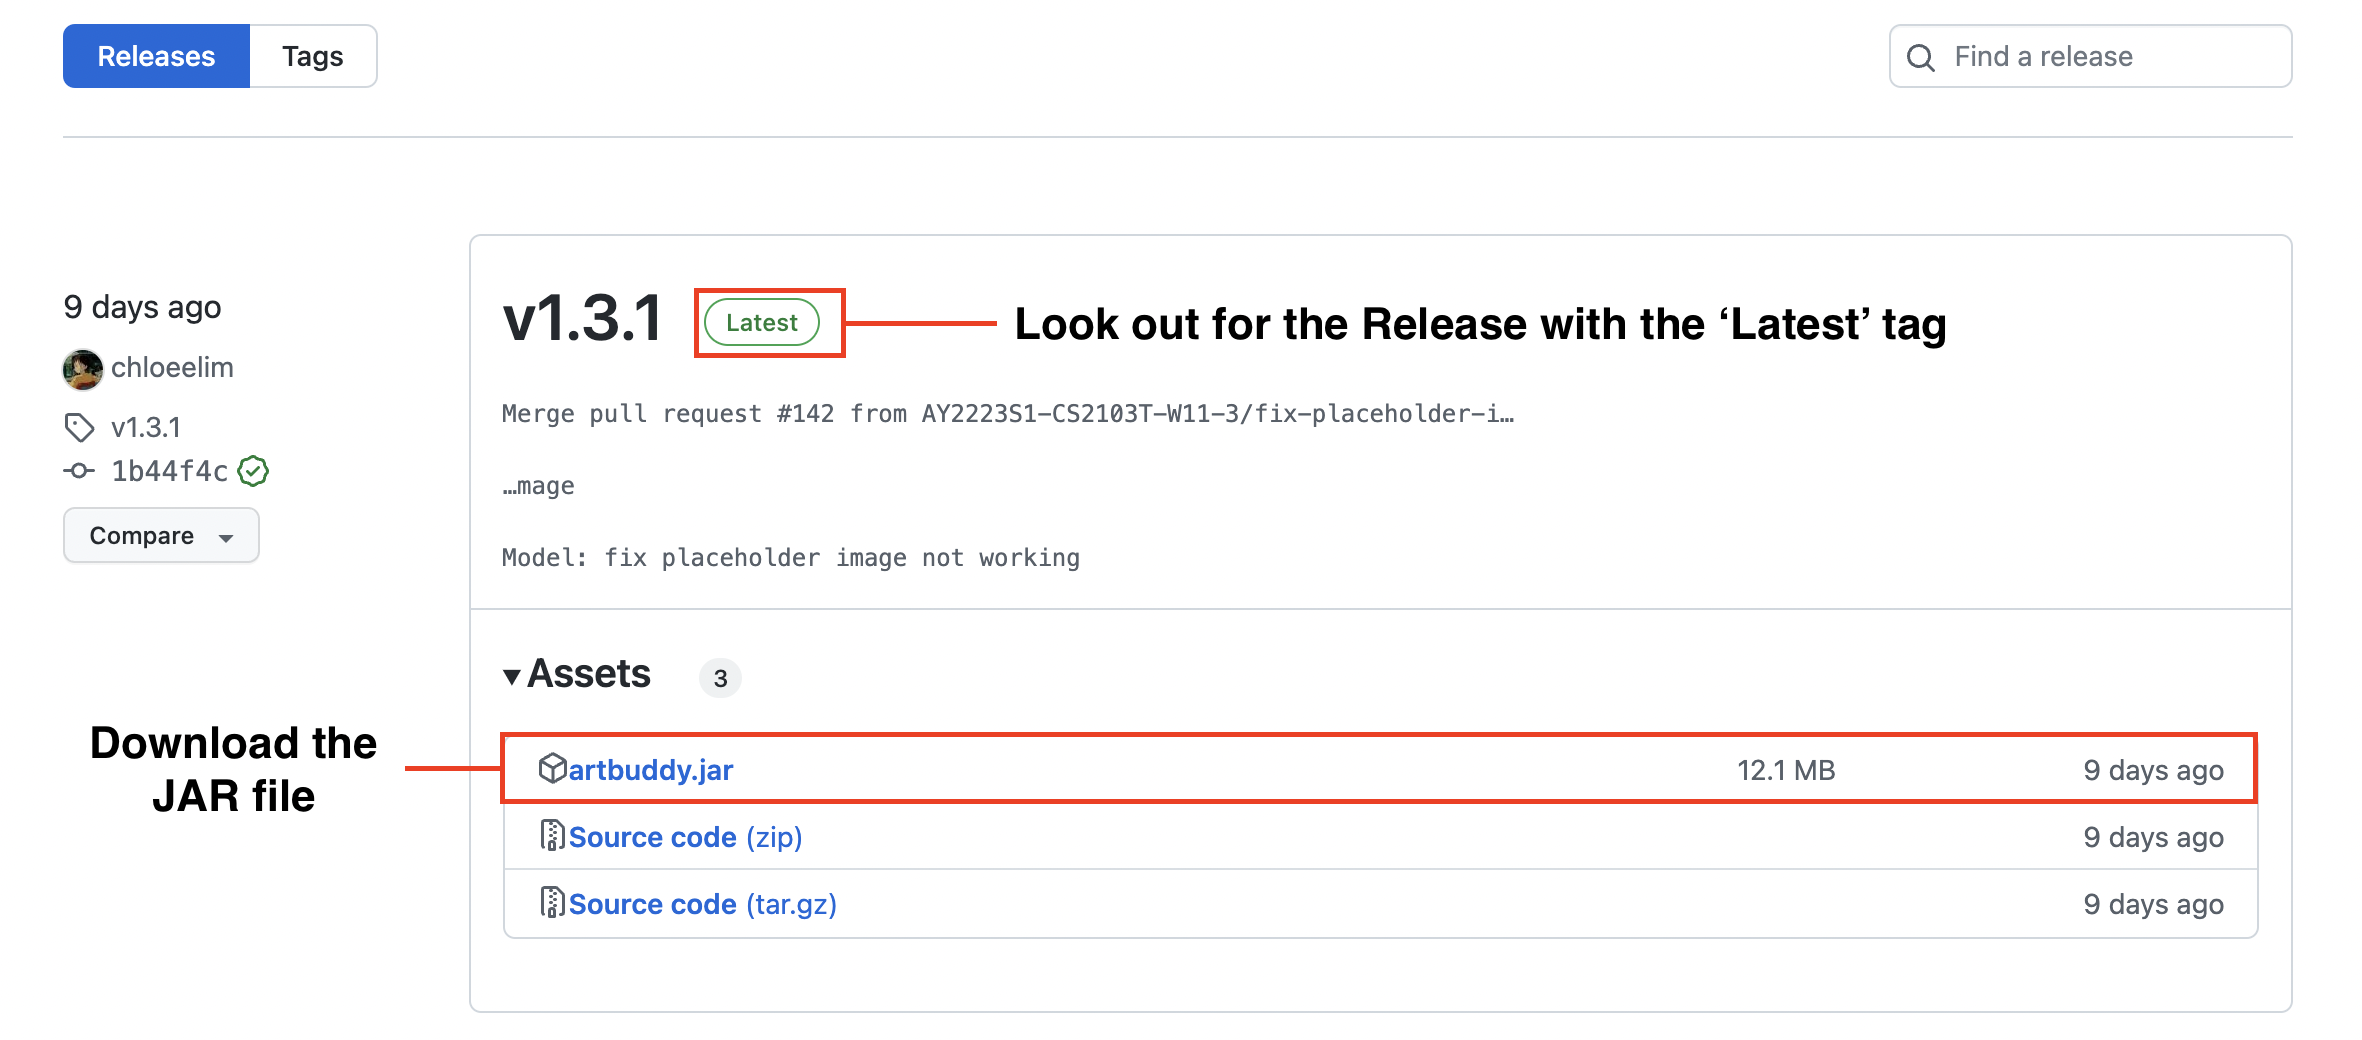
-
Create a new empty folder (with any name you like) in your computer where you’d like to store ArtBuddy.
-
Copy the downloaded ArtBuddy file (
artbuddy.jar) into the new folder. -
And…that’s it! You now have ArtBuddy installed on your laptop!
Starting up ArtBuddy
Nice! Now that you’ve downloaded ArtBuddy (if not, our installation instructions might be useful), let’s ArtBuddy up and running.
- To start ArtBuddy, simply open up the folder where your downloaded
artbuddy.jarfile is and double-click the file to start the app. - And…ta-da! You should now see ArtBuddy running on your computer!
Starting up ArtBuddy (macOS)
Due to the default privacy settings on macOS computers, ArtBuddy might not be able to read from or write to files on your macOS computer. Because of this, some features like uploading images to ArtBuddy might not work properly. To get ArtBuddy working properly on your macOS computer, follow these instructions instead to get ArtBuddy up and running!
- Locate the folder where your downloaded
artbuddy.jarfile is stored, and right click (or do a 2-finger press on your Apple trackpad) on your folder. Click on the Services option in the menu that pops up. - This should reveal a New Terminal at Folder option, as shown below.
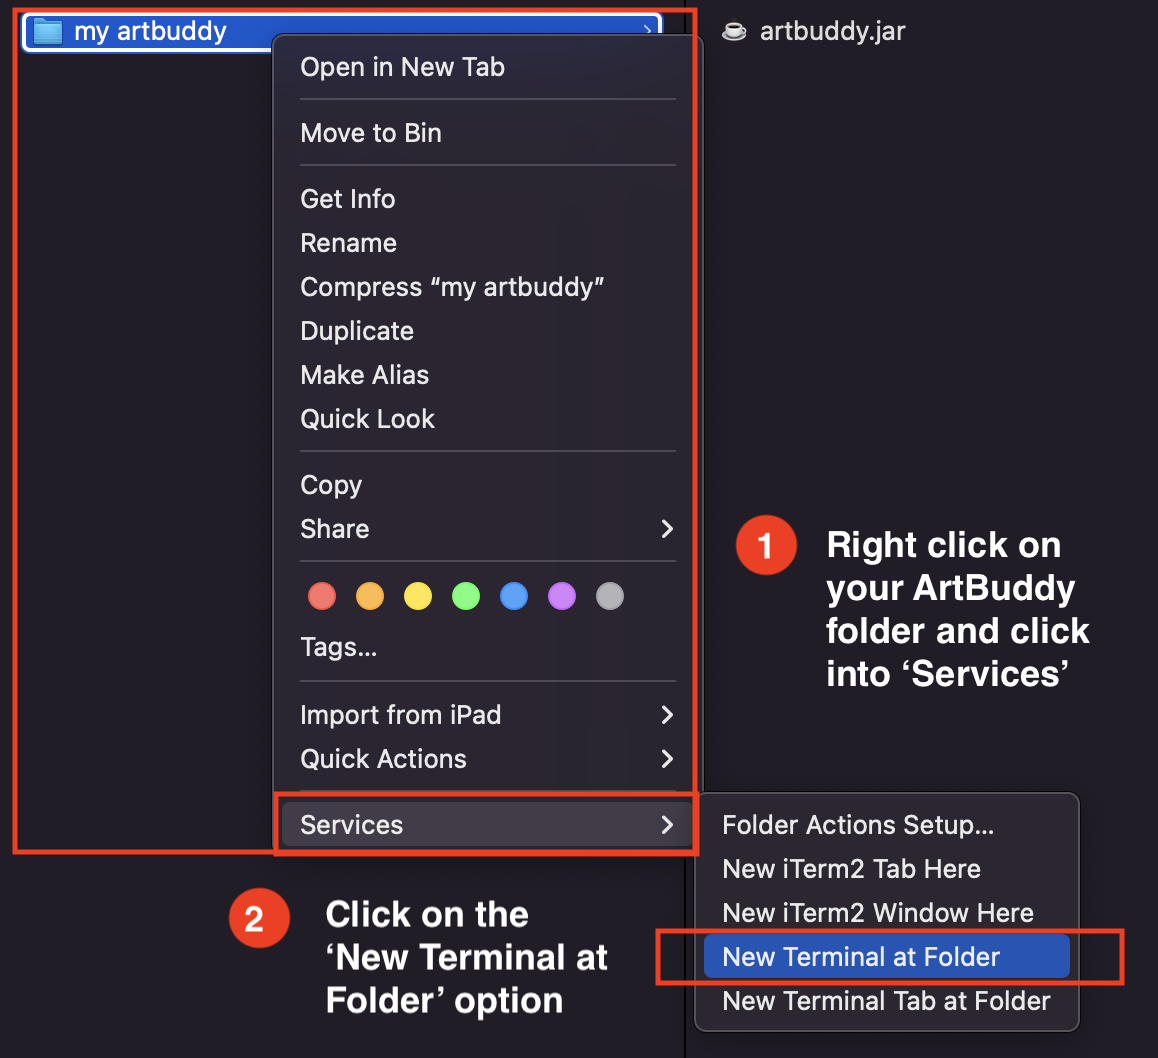
- Click on the New Terminal at Folder option. You should see a Terminal window open. The Terminal is just macOS’s own CLI that will allow you to communicate with your macOS computer.
- To let your computer know you want to run ArtBuddy, simply paste this command:
java -jar artbuddy.jarinto the Terminal window and hit return on your keyboard.
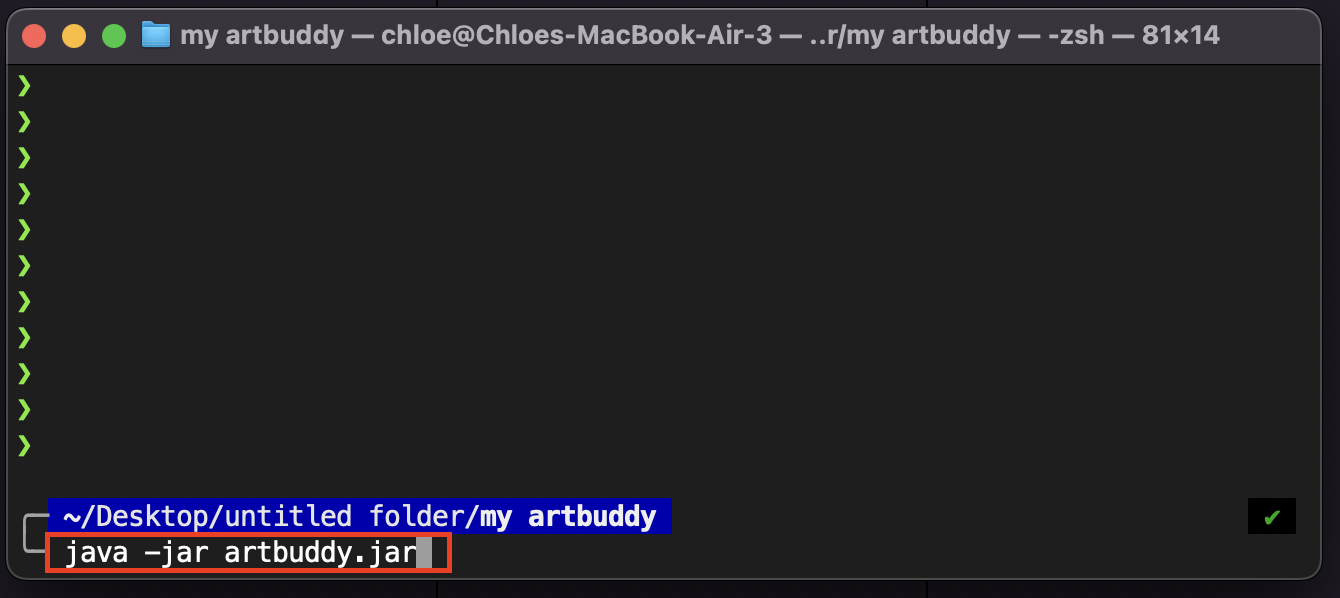
- And…ta-da! You should now see ArtBuddy running on your computer!
Getting familiar with ArtBuddy’s interface
Cool! You now have ArtBuddy up and running. Let’s get you familiar with ArtBuddy’s user interface.
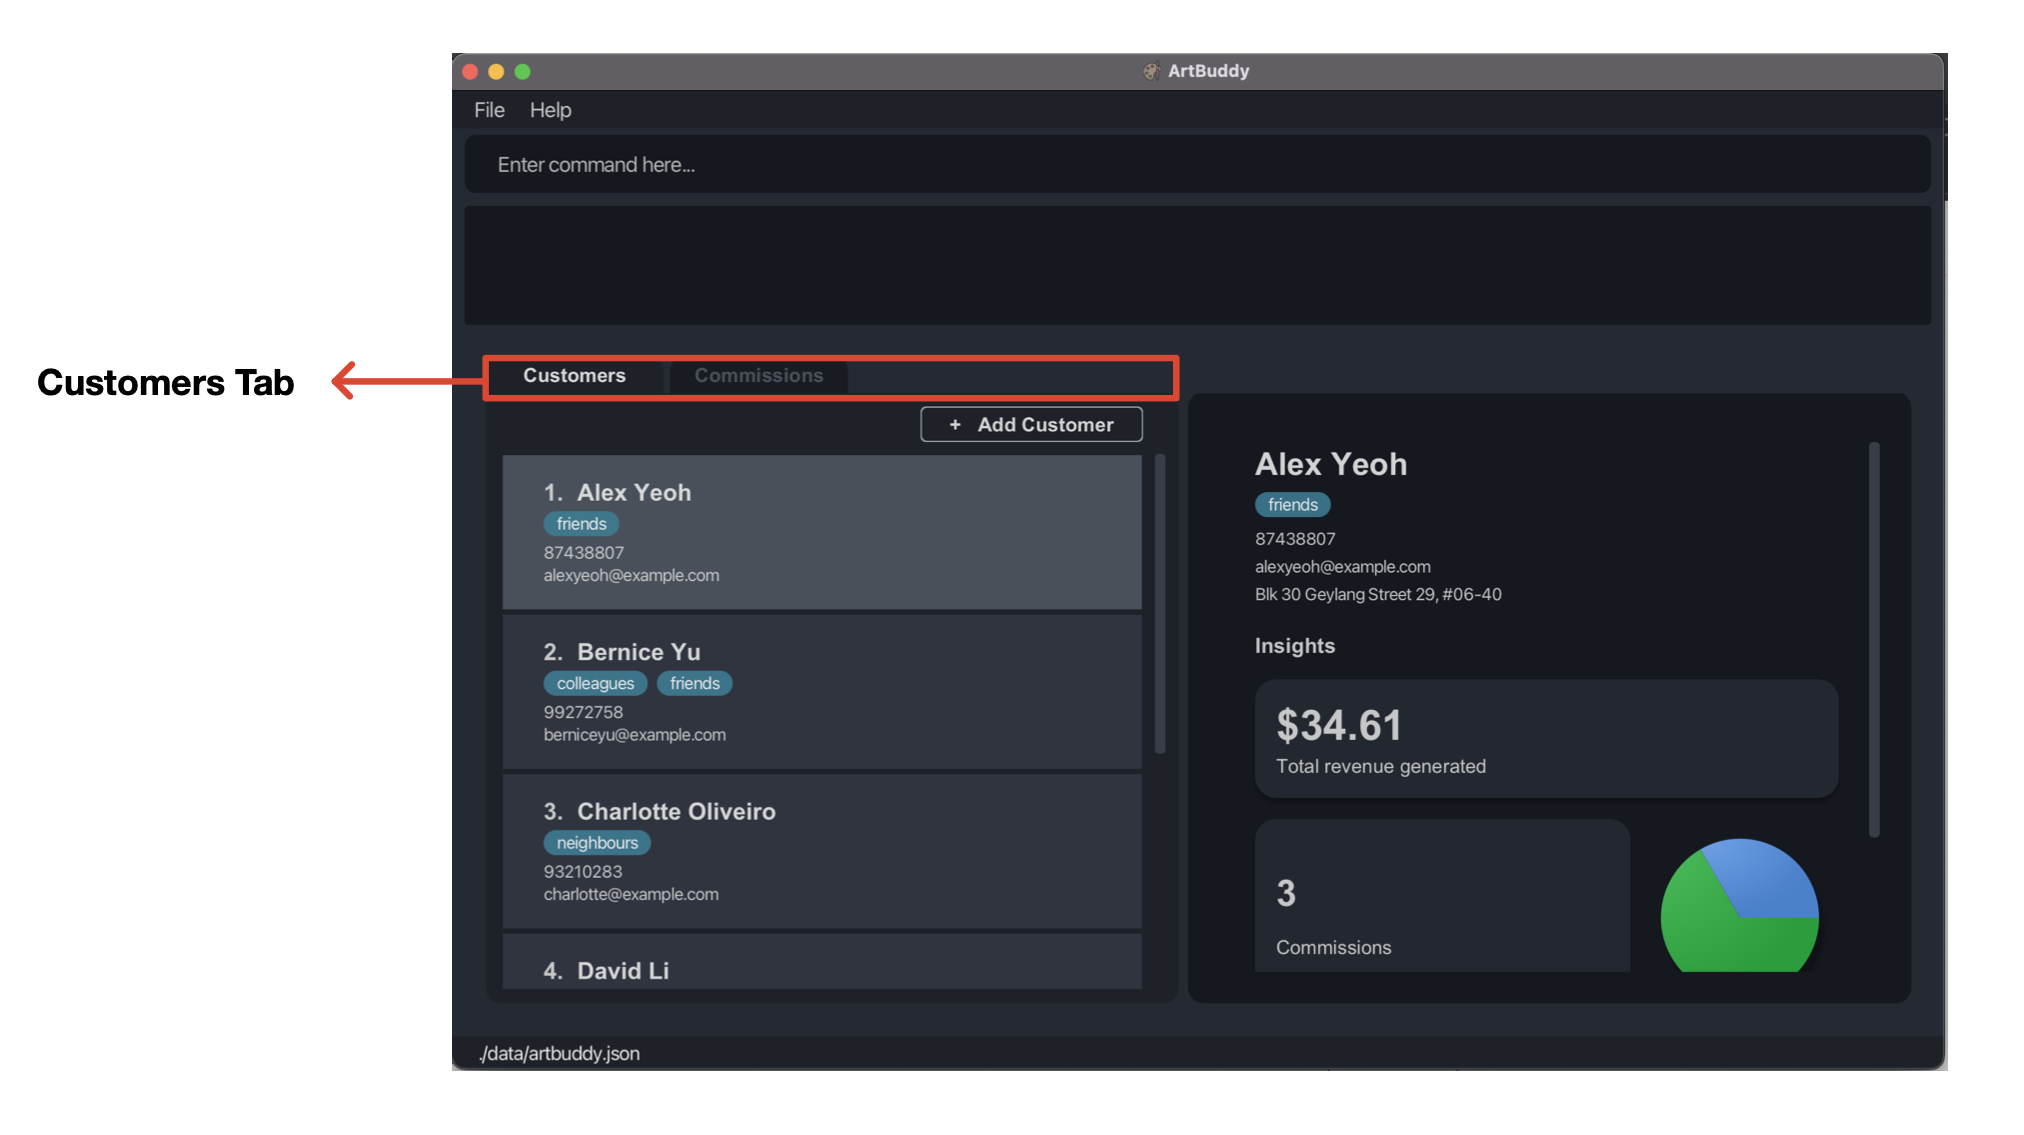
ArtBuddy has two tabs: a Customers Tab, and a Commissions Tab. Let’s take a closer look at each tab individually.
Customers Tab
When you first open ArtBuddy, ArtBuddy will have the Customers Tab open by default. As its name implies, the Customers Tab shows all your customer related information. Let’s learn what each of these ArtBuddy components in your Customers Tab does!
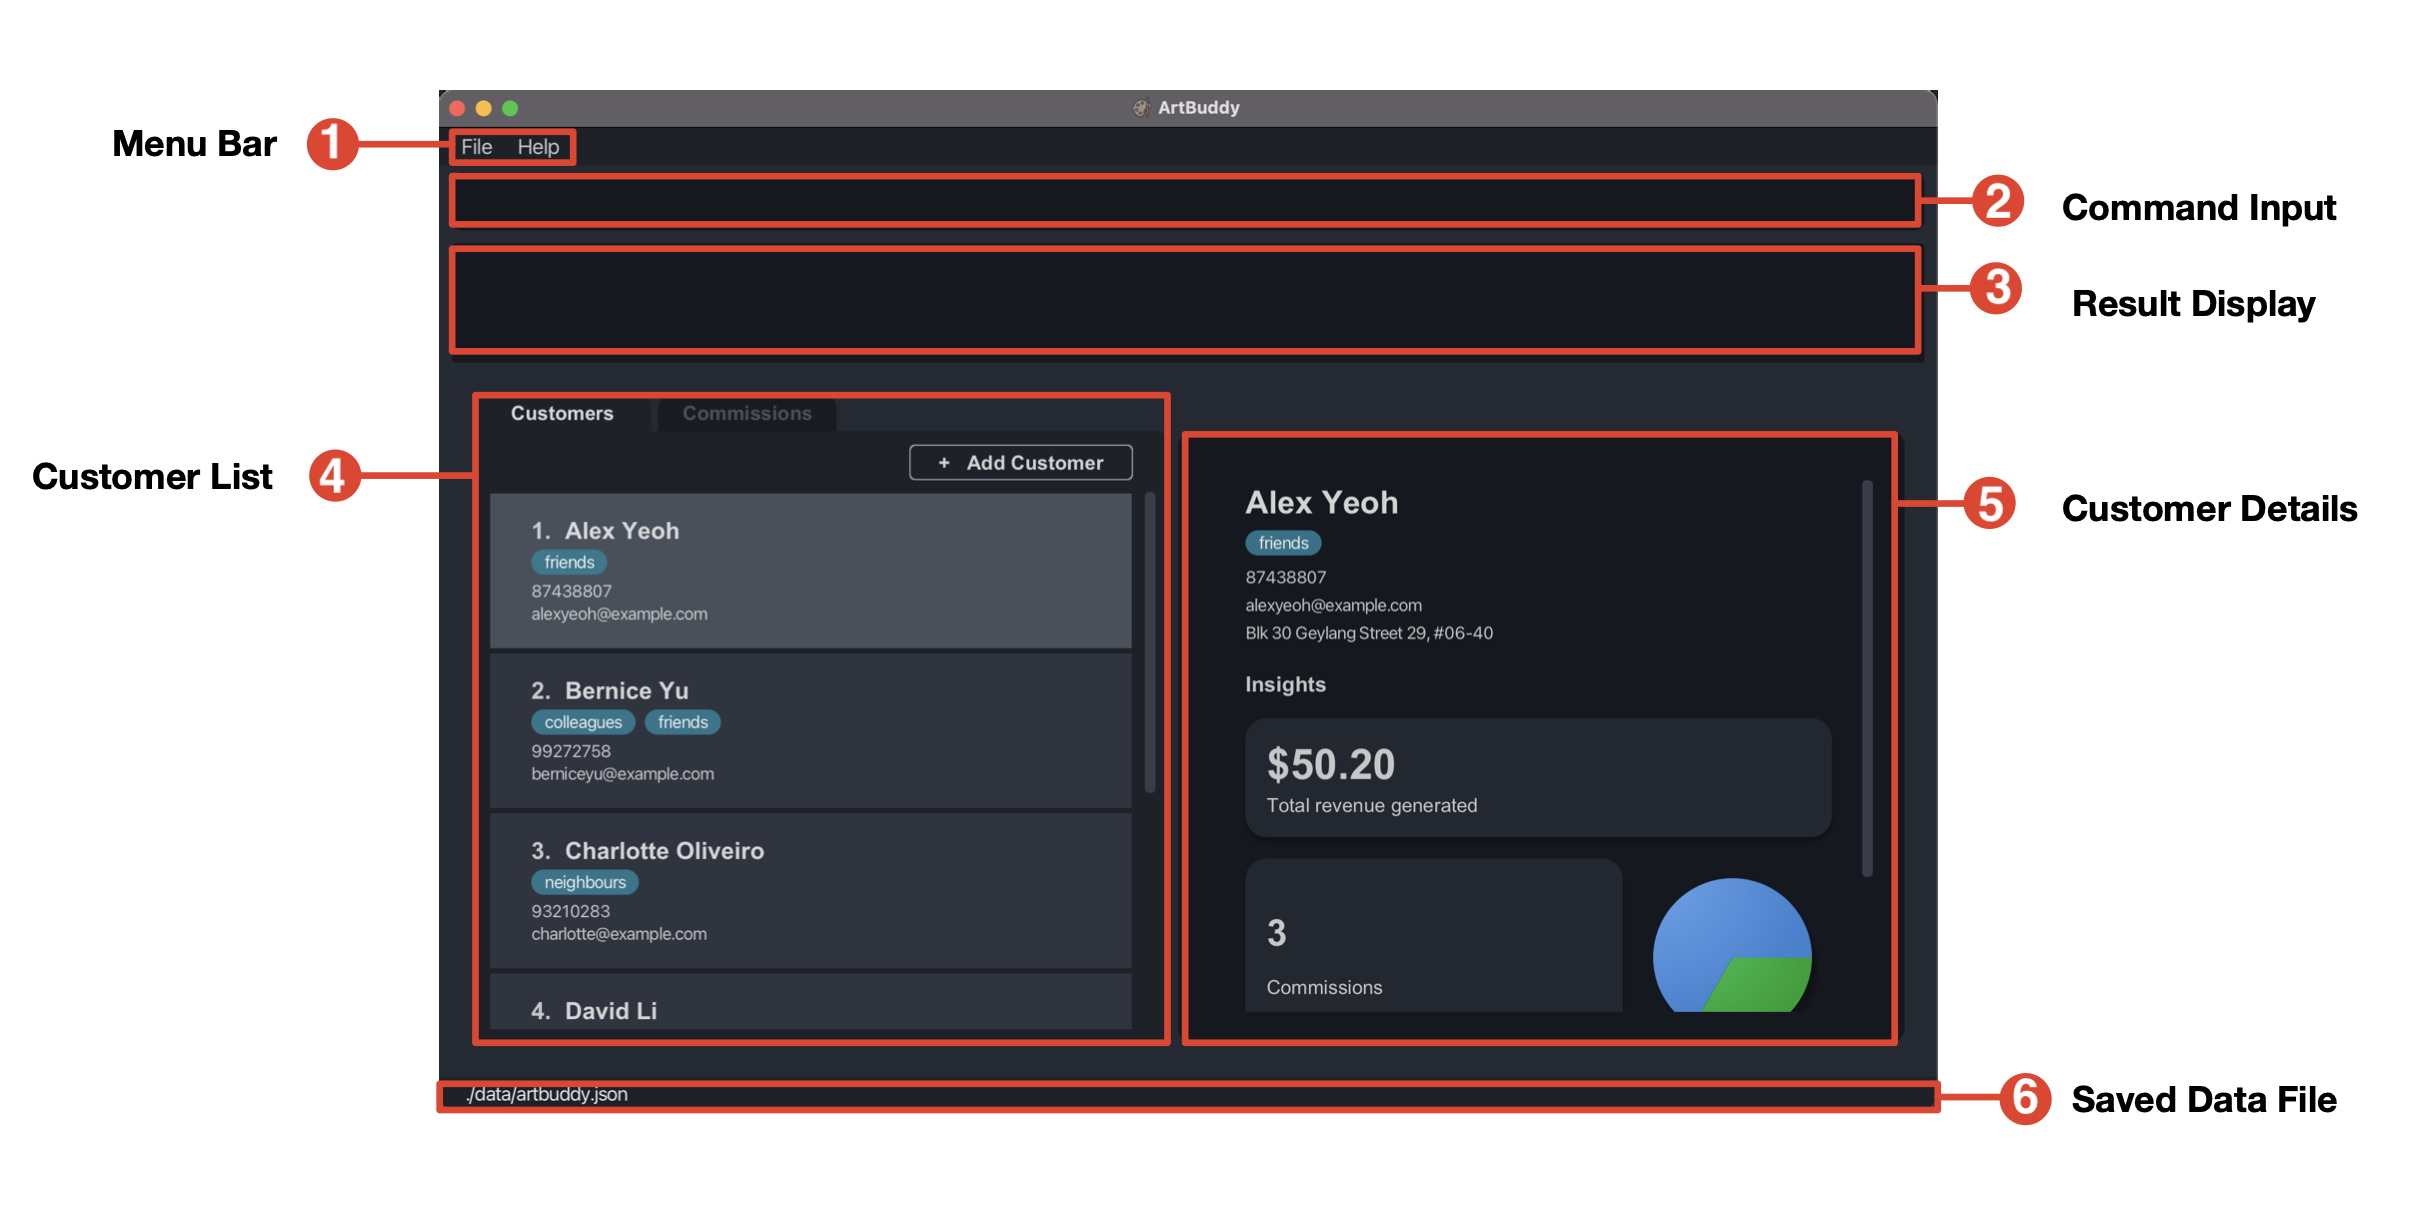
| Component | Description | |
|---|---|---|
| 1 | Menu Bar | The menu bar contains menu options to exit from ArtBuddy and to get help. |
| 2 | Command Input | The command input is where you can key in your commands to tell ArtBuddy what you want to get done. To learn more about ArtBuddy’s CLI, refer to the next section. |
| 3 | Result Display | The result display is where you’ll see ArtBuddy’s replies to your commands. |
| 4 | Customer List | The default tab opened when you first start ArtBuddy is the customer tab. Notice how the Customer tab is highlighted? That indicates that ArtBuddy is currently showing you your list of Customers. |
| 5 | Customer Details | When you select a customer from your Customer List, ArtBuddy will show you the details and statistics of your selected customer in this pane. |
| 6 | Saved Data File | For advanced users, the file path displayed here is where ArtBuddy stores your saved data (which you can edit). |
Statistics View
Let’s take a closer look at the customer statistics ArtBuddy offers. Analyse your revenue streams and keep your top customers happy!
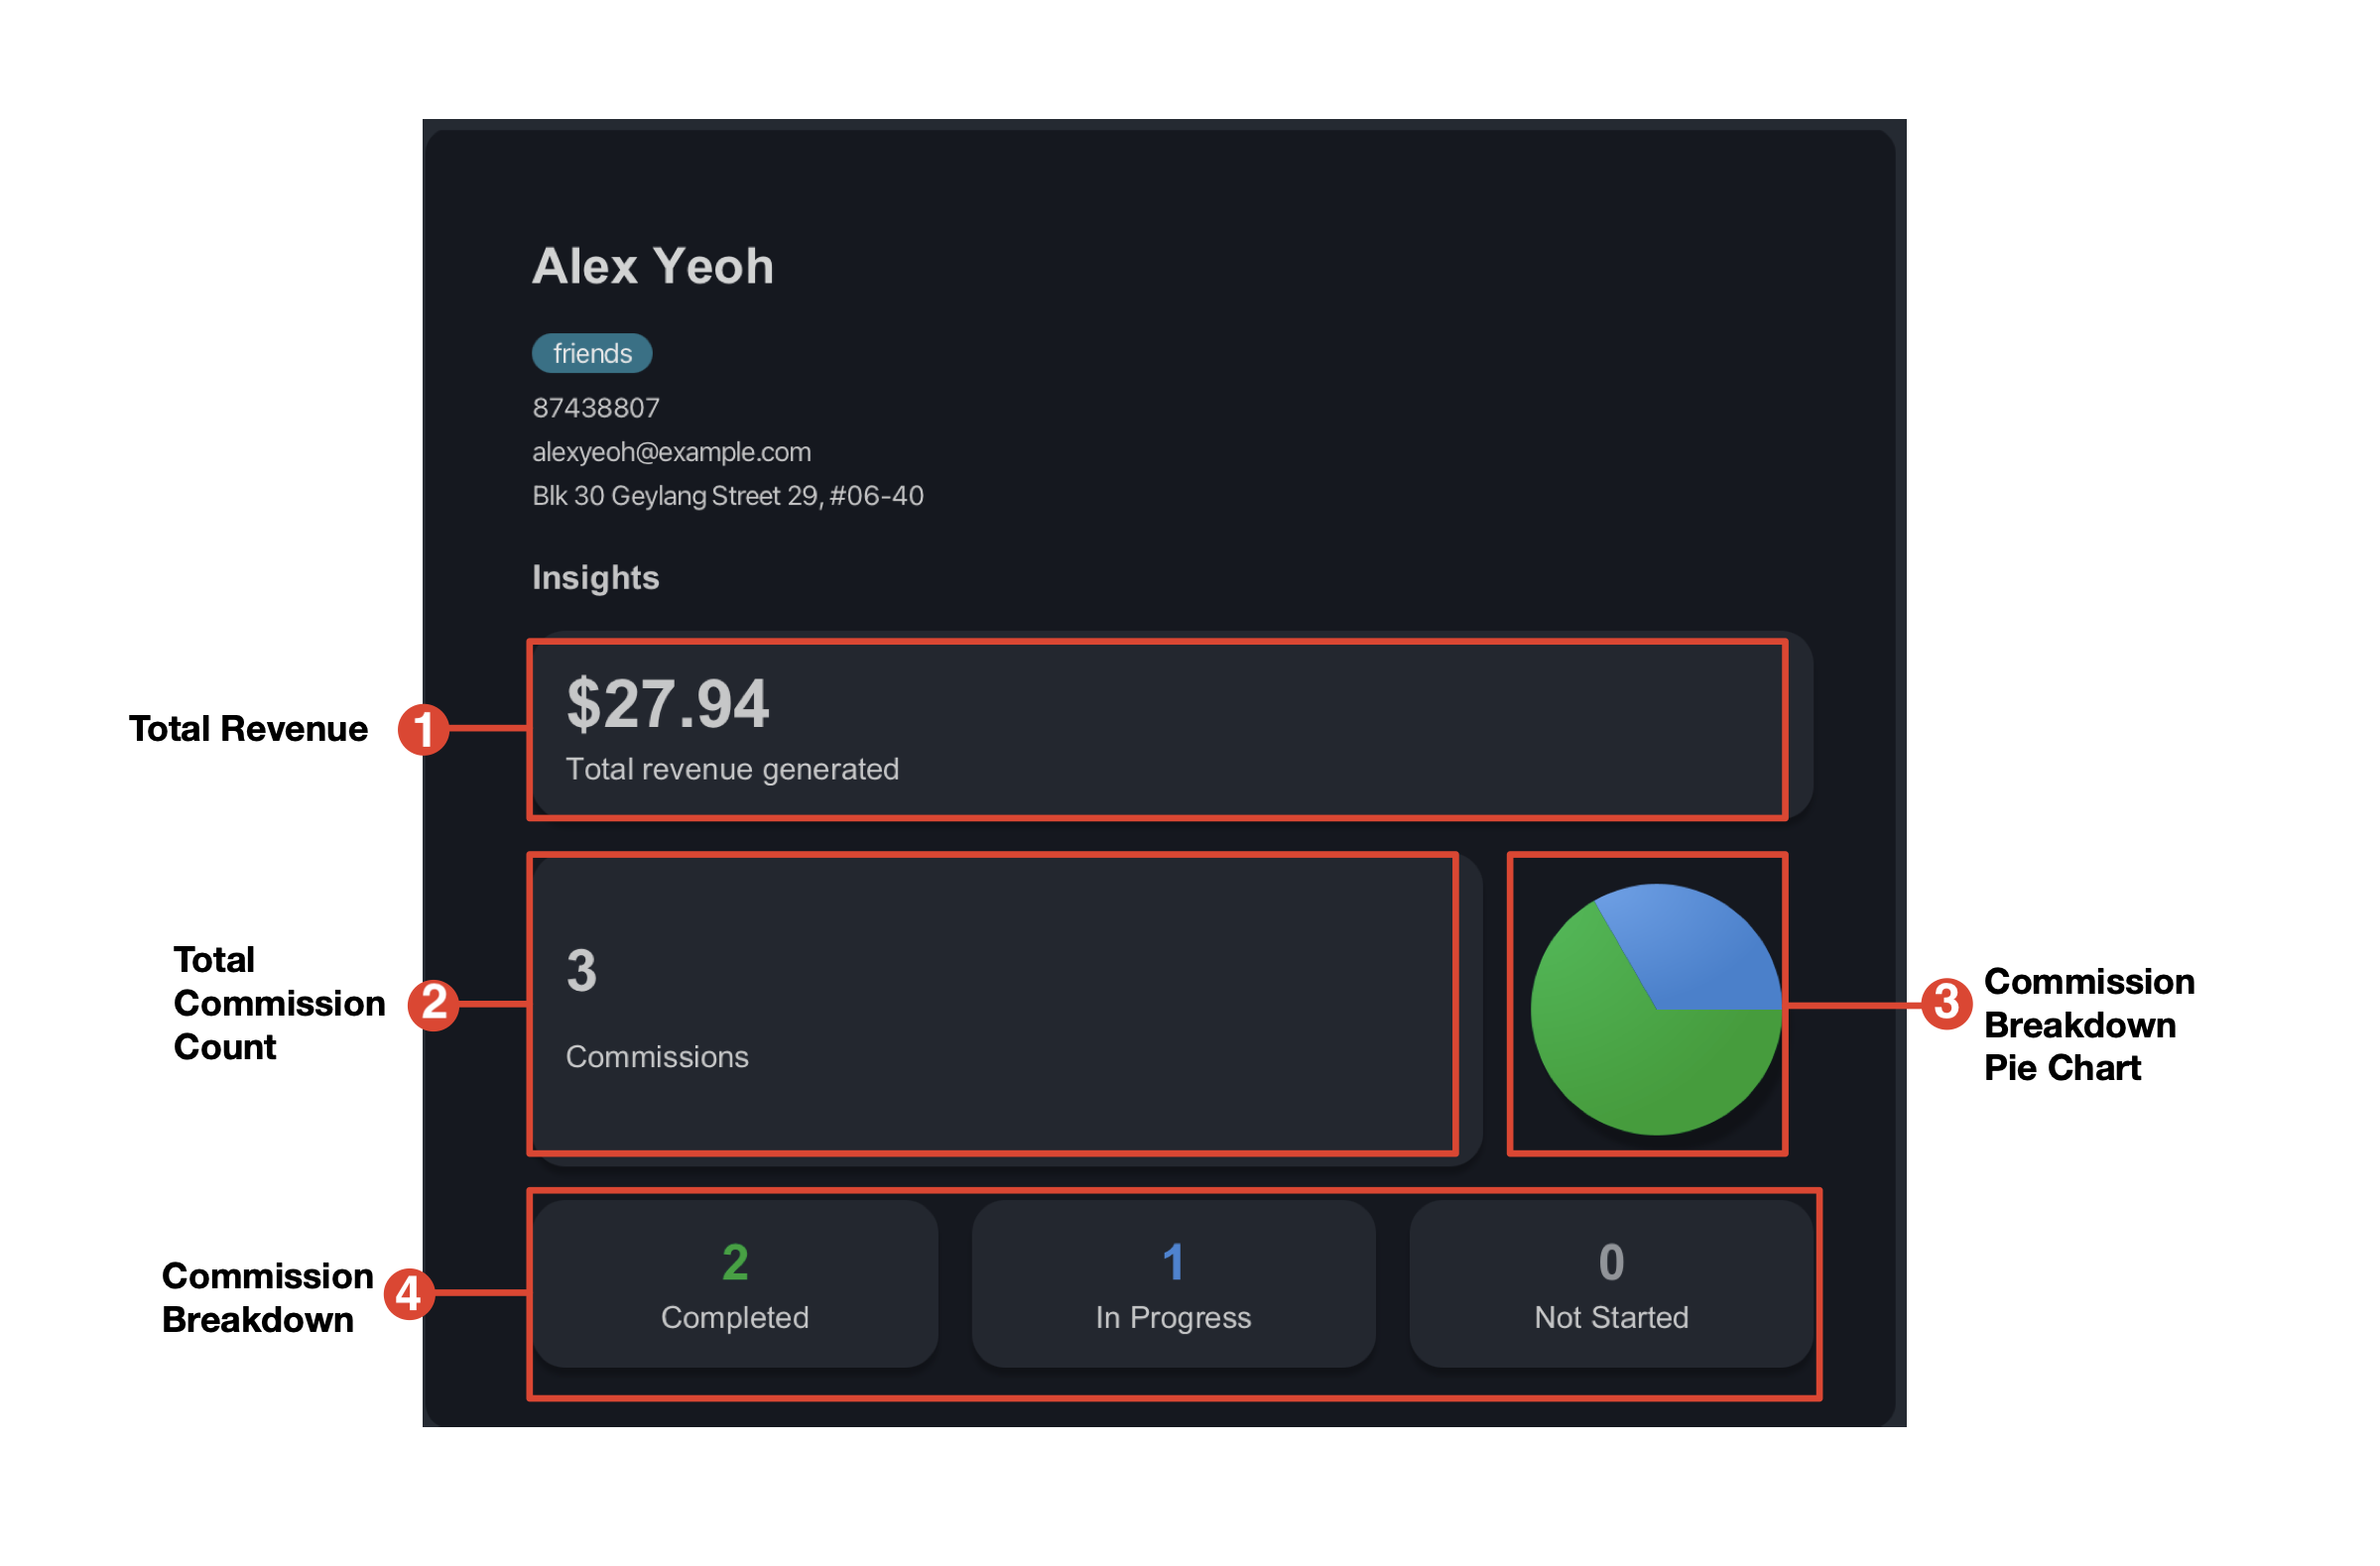
| Component | Description | |
|---|---|---|
| 1 | Total Revenue | Displays the total revenue you’ve generated from this customer. |
| 2 | Total Commission Count | Displays the total number of commissions commissioned by this customer. |
| 3 | Commission Breakdown Pie Chart | Provides visualisation of the breakdown of the customer’s commissions by their completion statuses in the form of a pie chart. |
| 4 | Commission Breakdown | Breaks down the commissions made by the customer by their completion statuses. |
Commissions Tab
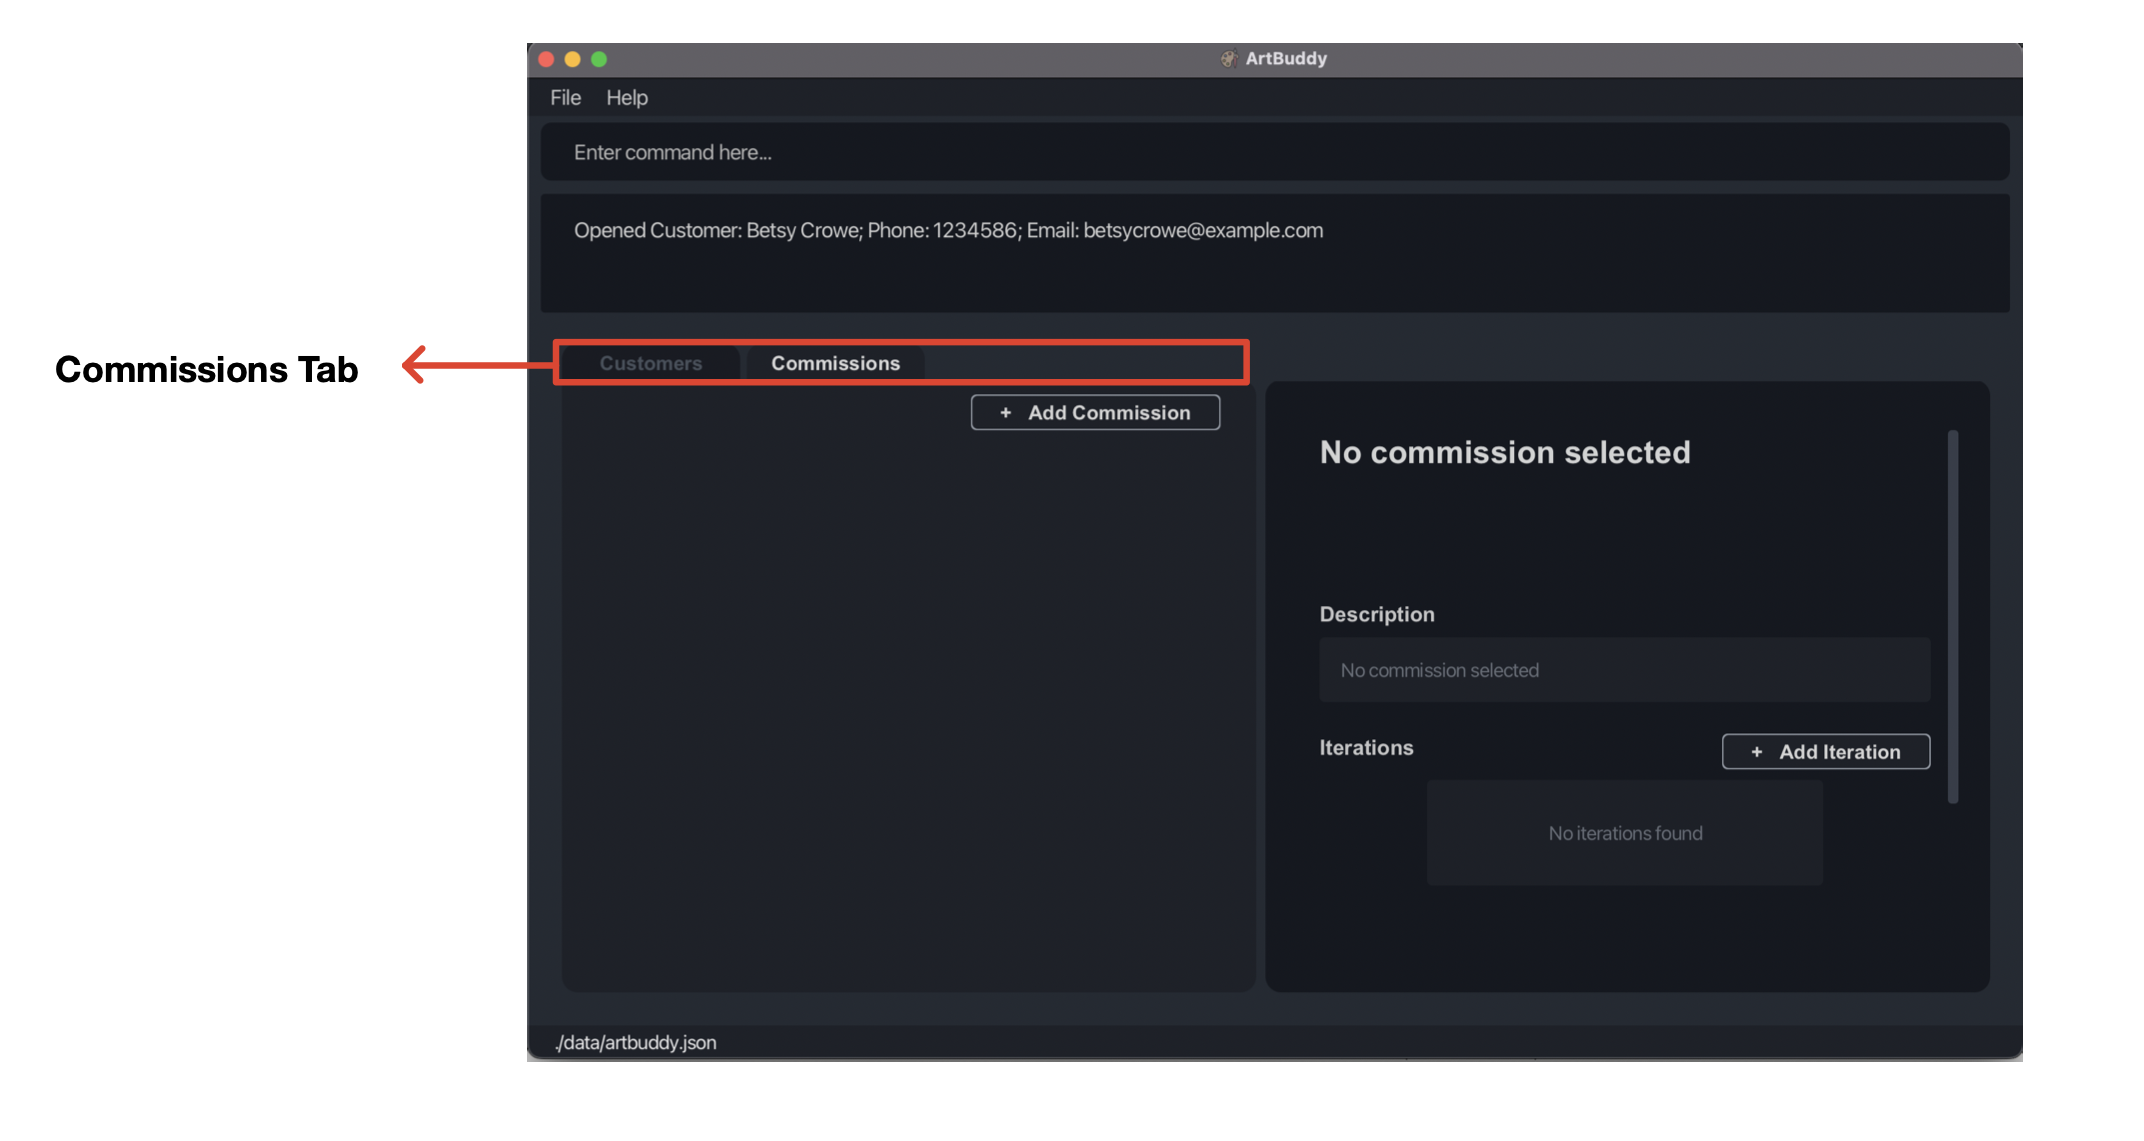
Notice that ArtBuddy also has a Commissions Tab? When you navigate to the Commissions Tab, this is what you’ll see. As you might’ve already guessed it, ArtBuddy’s Commissions Tab shows all commission-related information!
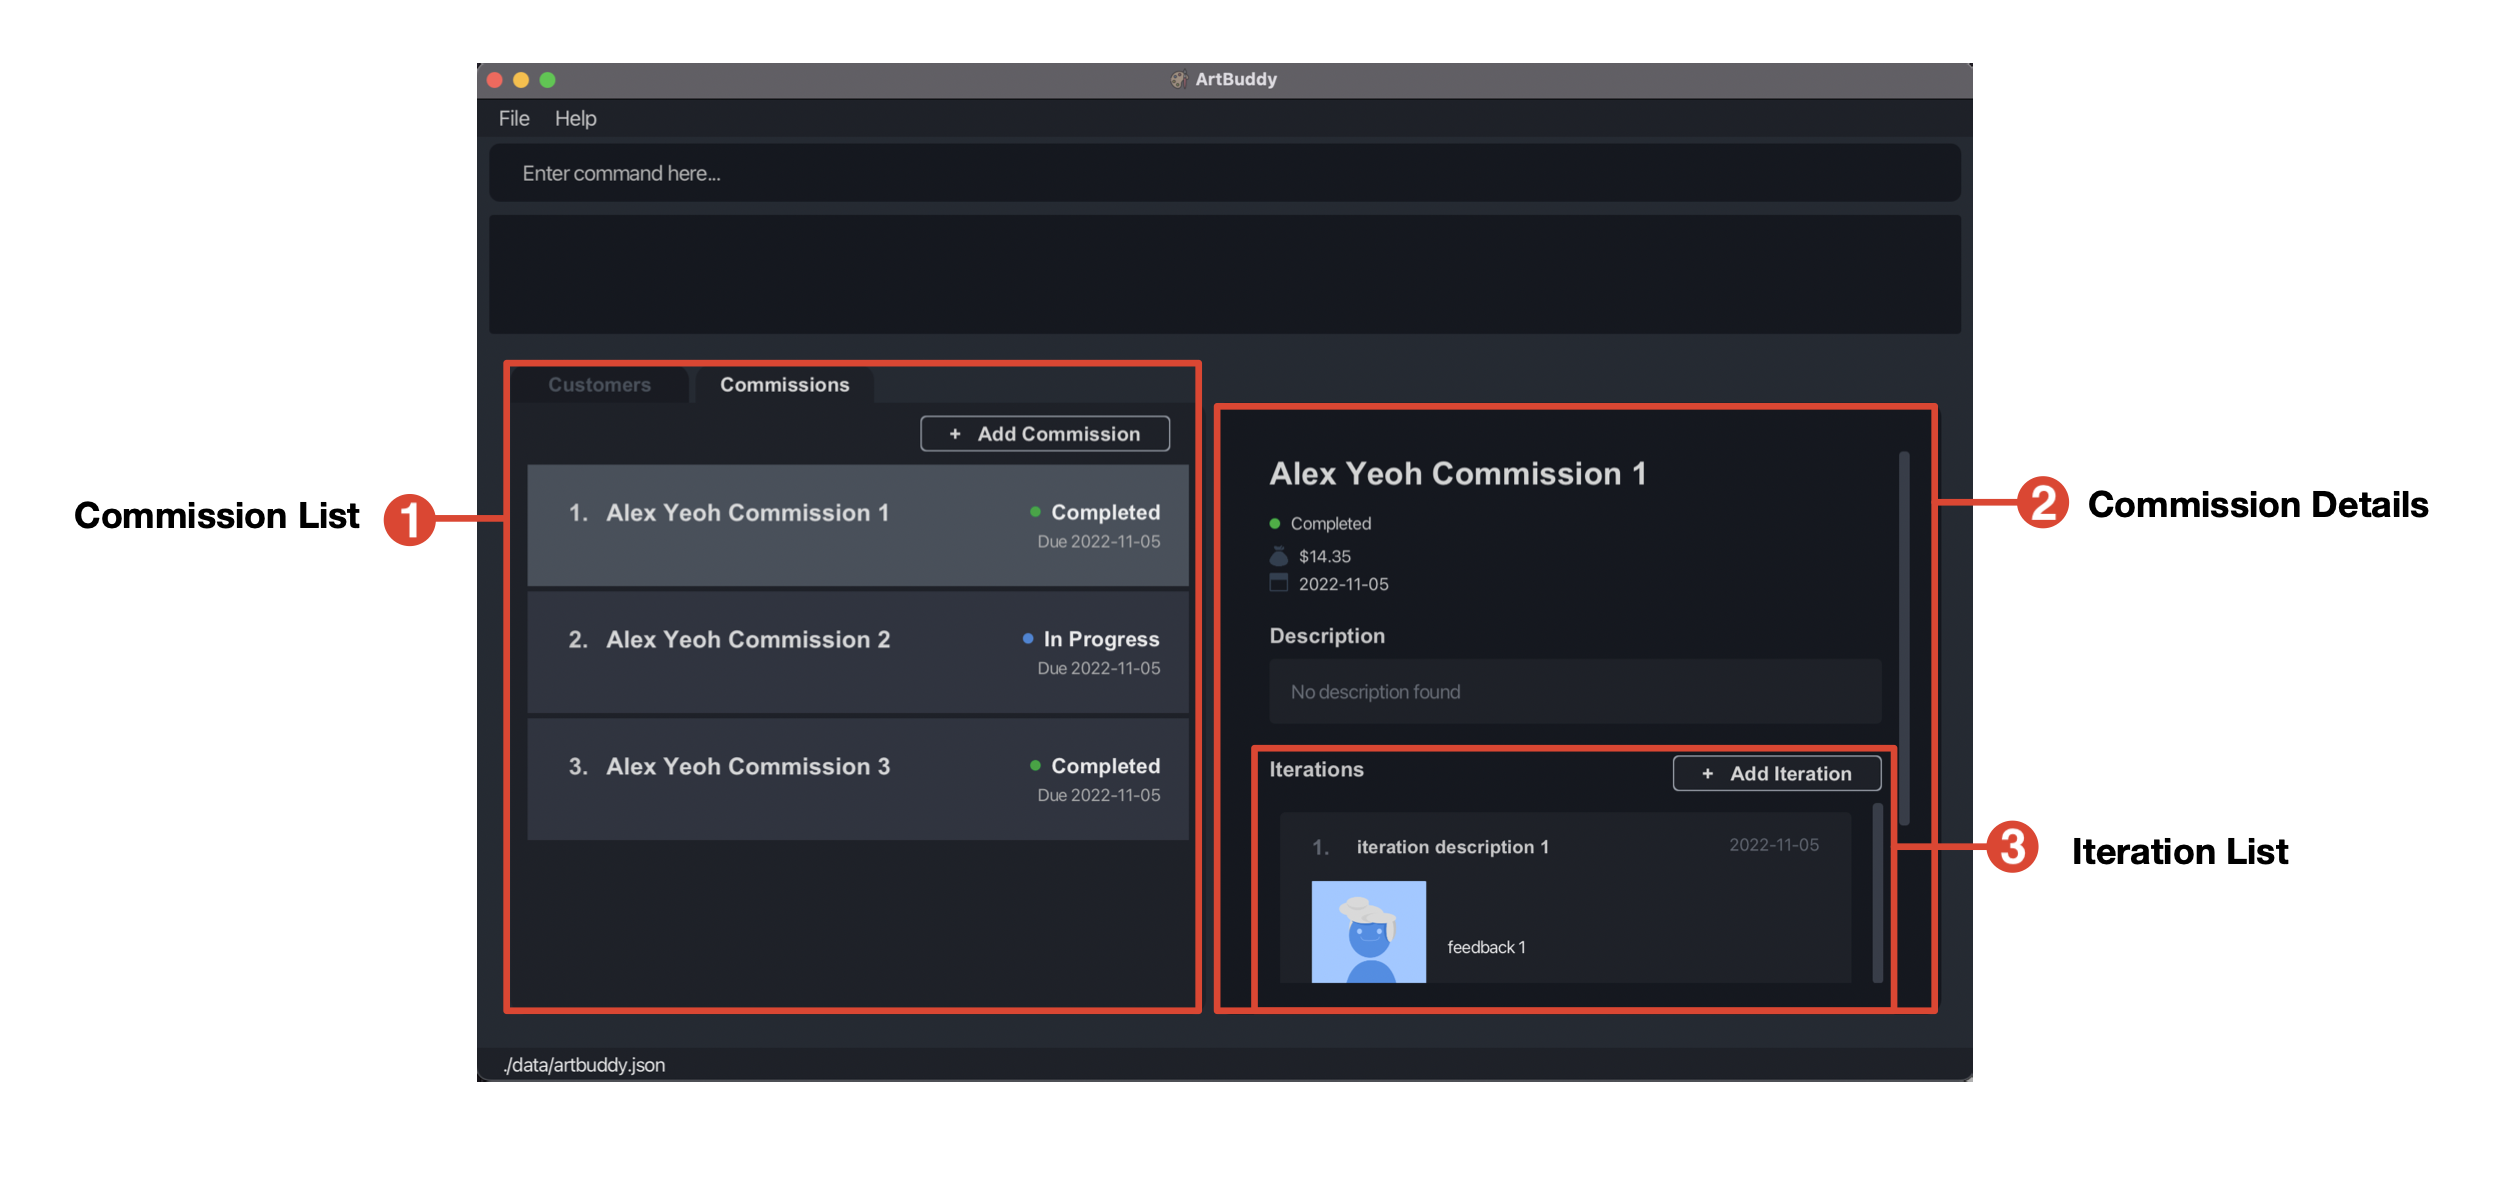
| Component | Description | |
|---|---|---|
| 1 | Commission List | By default, all the commissions of your currently selected customer will be displayed in the Commission List here. If no customer is currently selected, all commissions stored in ArtBuddy will be shown. |
| 2 | Commission Details | When you select a commission from your Commission List, ArtBuddy will show you the details of your selected commission in this pane. |
| 3 | Iteration List | Within the Commission Details pane, ArtBuddy will also display all your commission’s iterations here. |
ArtBuddy’s Command Line Interface (CLI)
ArtBuddy also has a Command Line Interface (CLI). This just means that besides interacting with ArtBuddy by clicking on buttons, you can also tell ArtBuddy what you want to get done just by using text input (known as commands). Cool right?
Right now, ArtBuddy only understands certain commands (the complete list of commands can be found in Features). These commands must be formatted in a specific way. It’s just the way ArtBuddy is wired to think and listen to words. So let’s learn how to talk to ArtBuddy!
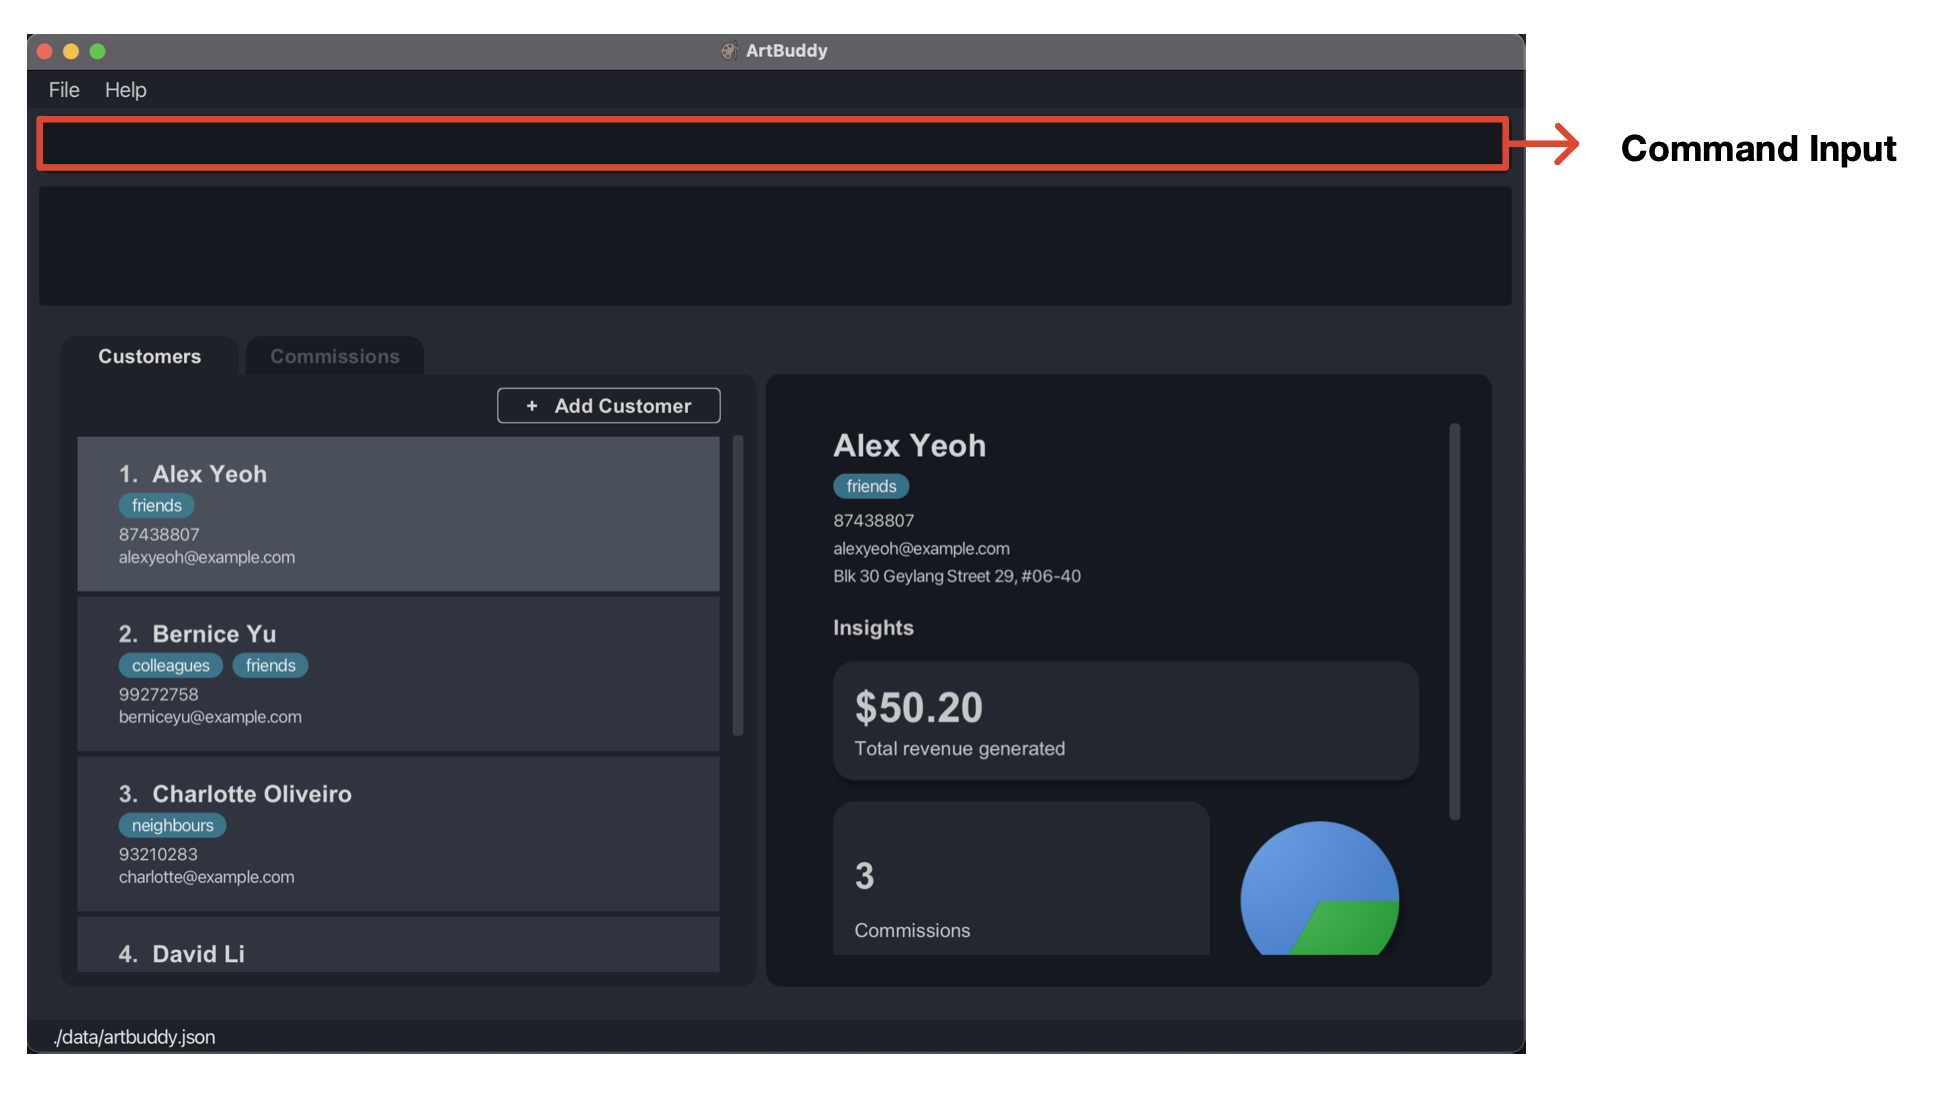
Command Input
The Command Input is where ArtBuddy’s ‘ears’ are. This is the rectangular text input box outlined in red below. To type in commands into the Command Input, just click on the Command Input and start typing away! Once you’ve typed in your command, just press ‘Enter’ (or ‘return’ for Mac users) on your keyboard and… voilà! ArtBuddy has just executed your command. It’s that easy!
ArtBuddy Commands
An ArtBuddy command is typically made up of the following parts:
Command keyword
This is the keyword that tells ArtBuddy exactly what command you wish to execute. All ArtBuddy commands have a unique command keyword so ArtBuddy knows what you want to do.
Index
Some ArtBuddy commands have an index, this simply a number that uniquely identifies the customer, commission, or iteration that you wish to execute your command on. A customer’s or commission’s index is simply the number that appears beside your customer’s name, or commission’s title.
Command parameters
Some ArtBuddy commands also accept command parameters. These are just additional
inputs that ArtBuddy requires to execute some commands properly. For instance, to add a customer, ArtBuddy
needs to know the name of the customer which you’ll need to pass into ArtBuddy as a command parameter.
For ArtBuddy to understand these command parameters, you need to attach a ‘prefix’ in front of
each of these parameters.
![]() Note: Advanced details on ArtBuddy command parameters can be found in
Appendix: Further notes on command parameters.
Note: Advanced details on ArtBuddy command parameters can be found in
Appendix: Further notes on command parameters.
Quick tutorial
Itching to get started with ArtBuddy? Let’s run you through some simple commands to get you warmed up before you dive right into ArtBuddy’s full feature list!
![]() Note that the images used in this section are only meant to be used as references.
ArtBuddy might appear differently on your computer because as the data shown in this sample reference may differ from
the data stored in your application.
Note that the images used in this section are only meant to be used as references.
ArtBuddy might appear differently on your computer because as the data shown in this sample reference may differ from
the data stored in your application.
Let’s start by getting our hands cracking with some simple customer-related commands! Make sure the Customer Tab is open before trying out the following steps so you can observe what happens!
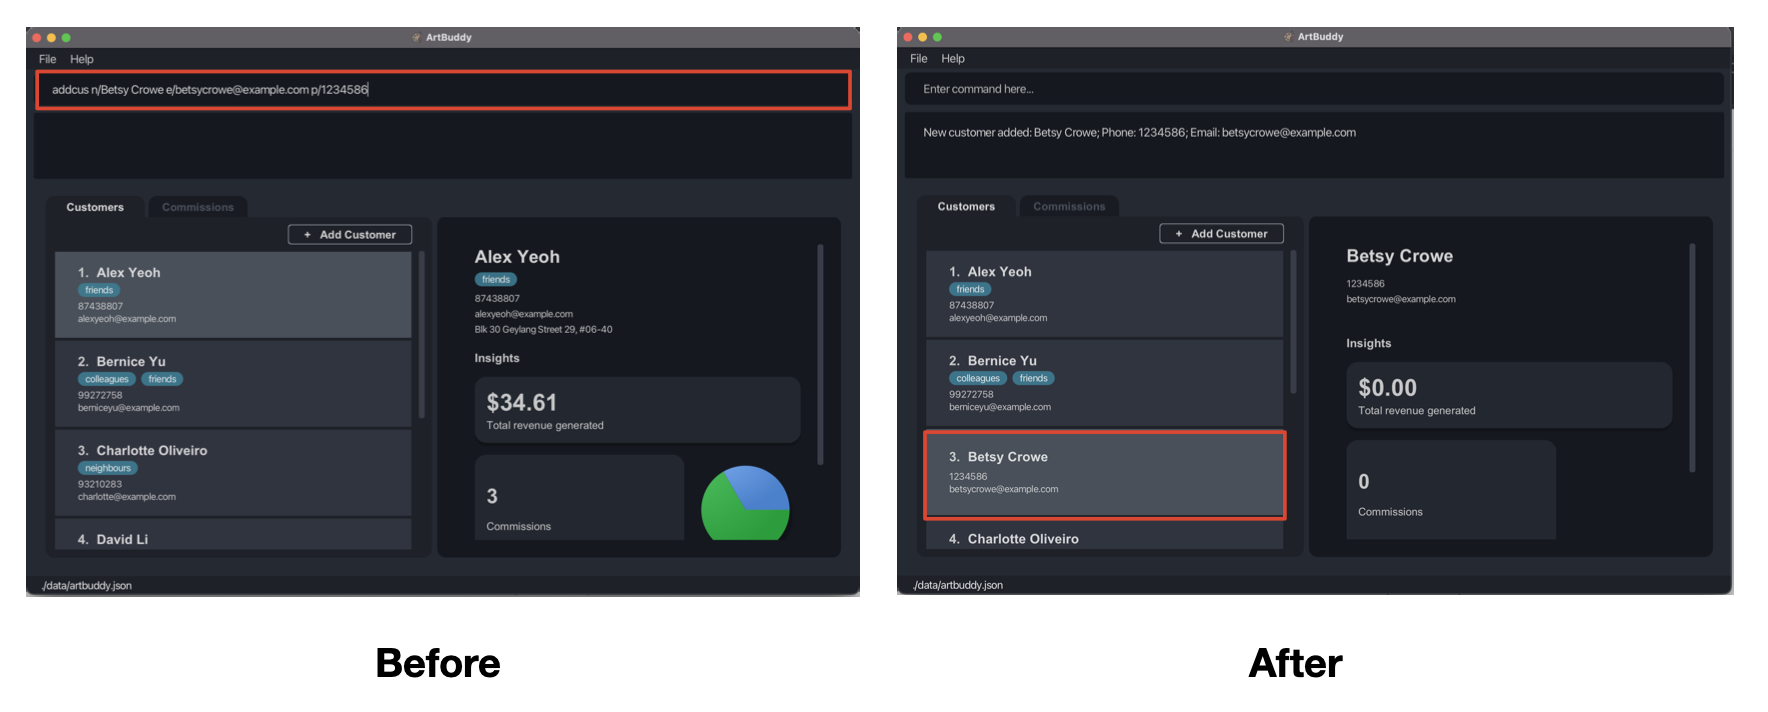
- Suppose you’ve just received a new customer, Betsy, and you want to add her into ArtBuddy. Easy! Try
running the command
addcus n/Betsy Crowe e/betsycrowe@example.com p/1234586.- You’ll notice that ArtBuddy has just created a new customer, Betsy Crowe!
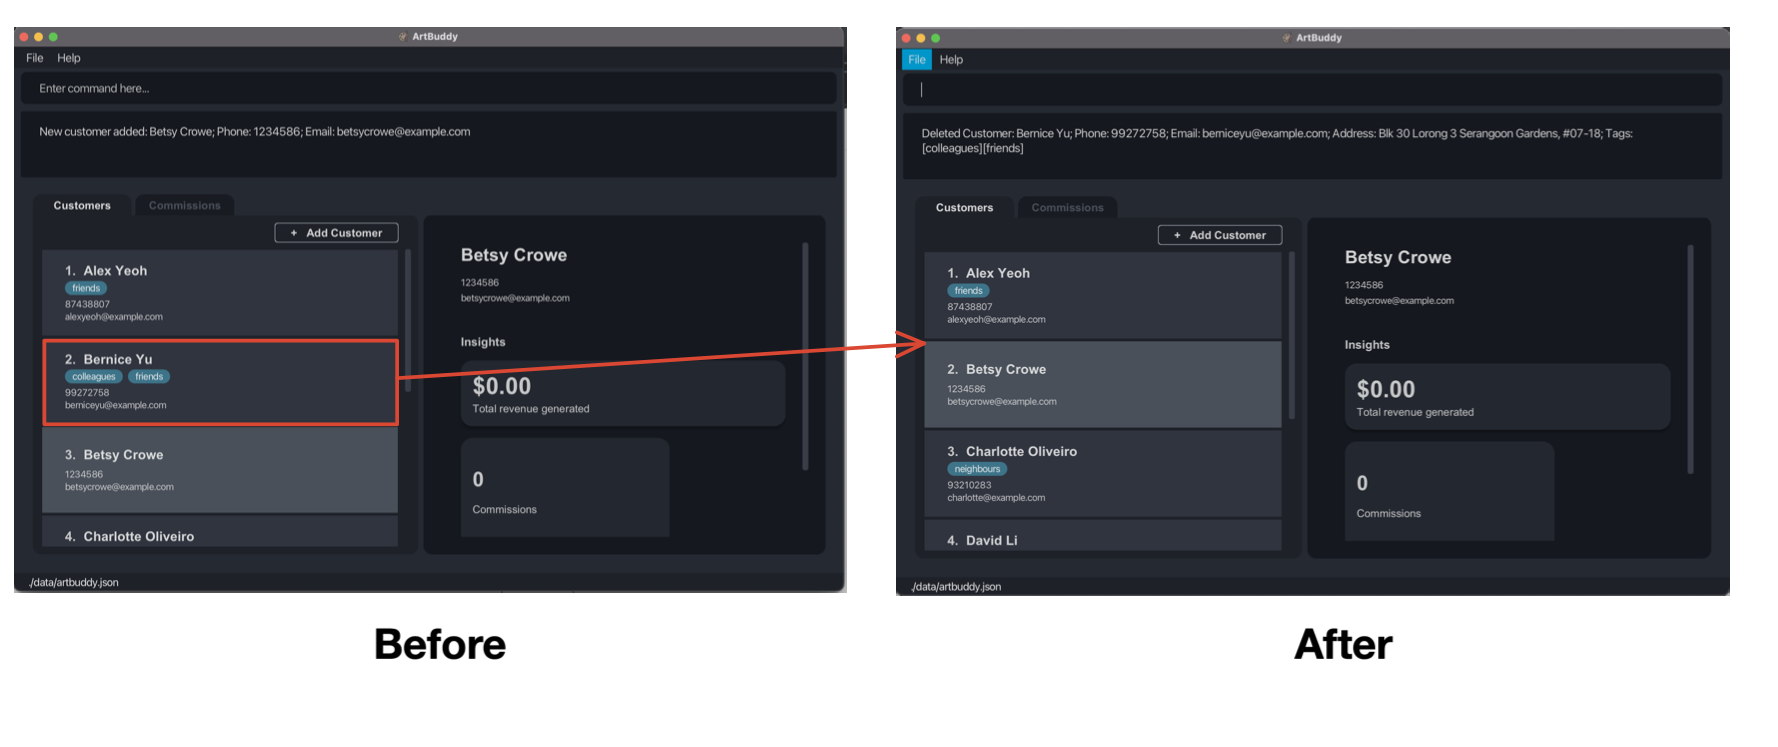
- Now suppose you want to delete a customer, Bernice, because she has decided to cancel her commission. This time, try
running
delcus 2.- Ta-da! After executing the command, Bernice is now deleted from ArtBuddy.
Now that you’ve been introduced to some customer-related commands, let’s change things up by checking out some commission commands.
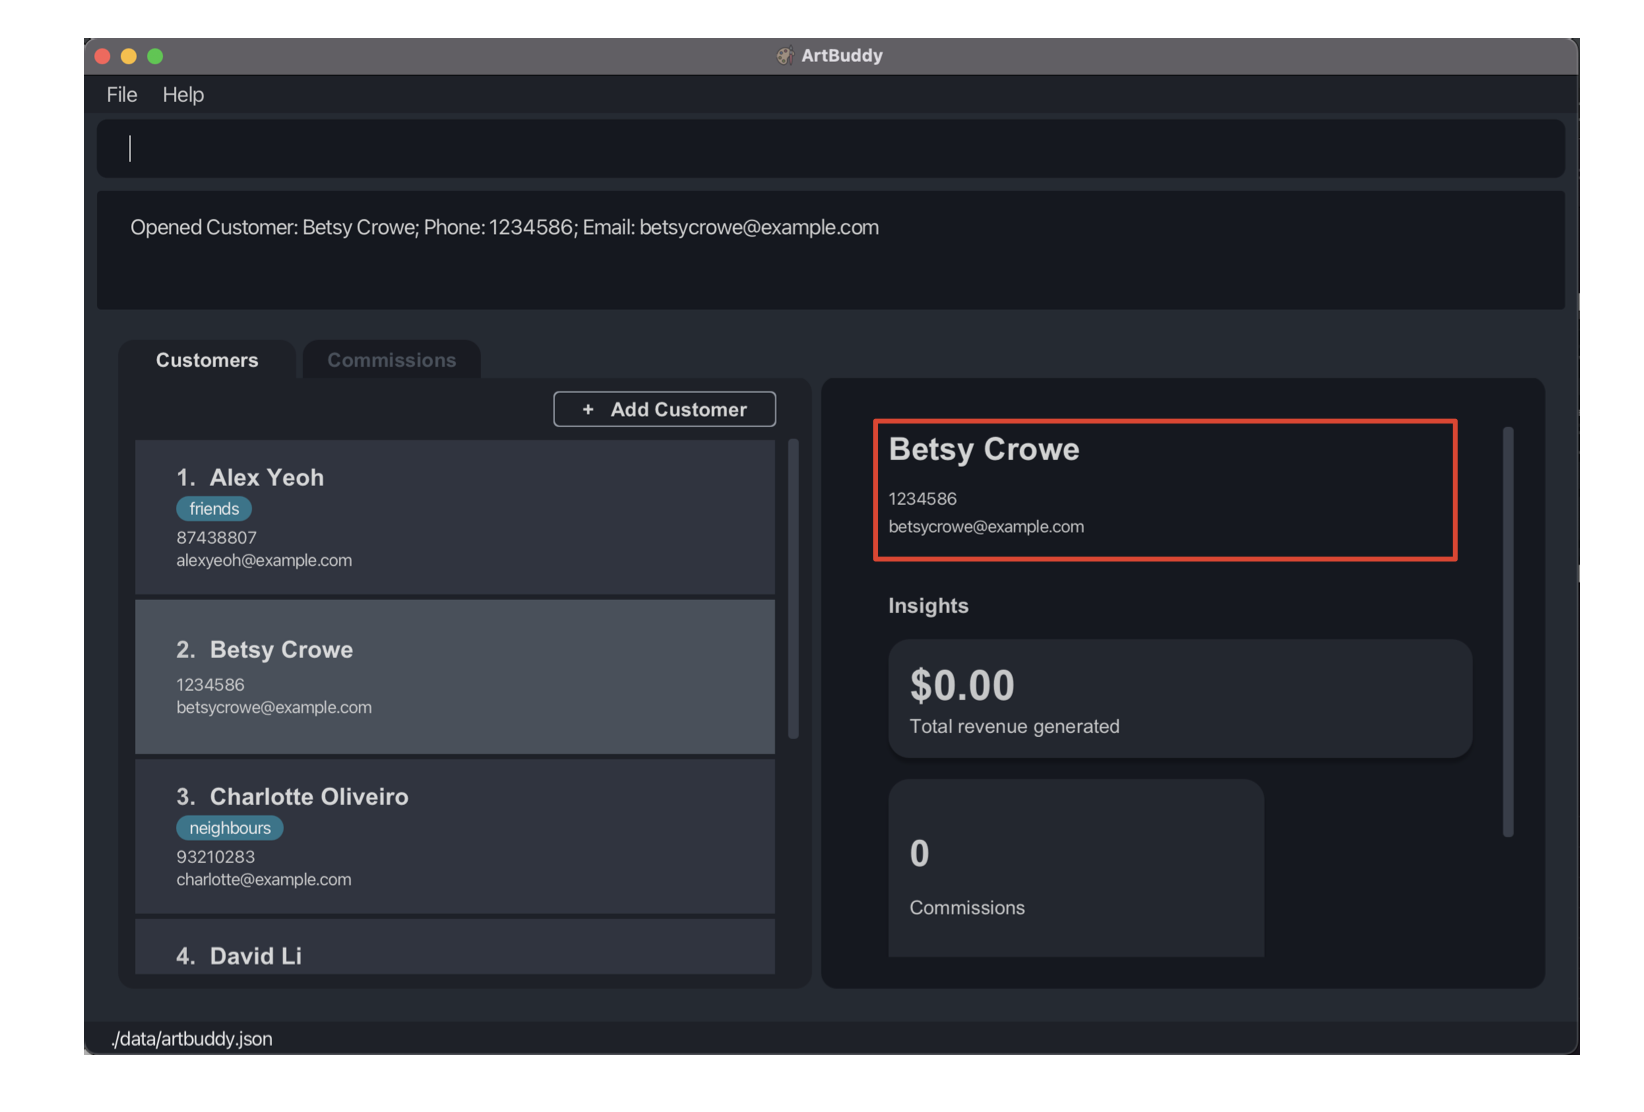
- Suppose you want to manage Betsy’s commissions. Let ArtBuddy know this by first ‘opening’ up Betsy’s details in the
Customers Tab. You can do this by clicking on Betsy’s entry in the Customer List, or by executing the command
opencus 2.- You should notice that Betsy’s details appear in the Customer Details pane as shown below.
-
Now, switch to the Commissions Tab where all of Betsy’s commissions are displayed. This tab should be empty right now because Betsy has no commissions yet. Let’s change that!
-
Try running the command
addcom n/Fate Archer f/60 d/2022-10-15 s/true p/Archery t/night t/city.- Nice! Betsy should now have a new commission titled “Fate Archer”. You should also see the details of the newly created commission appear in the Commission Details pane.
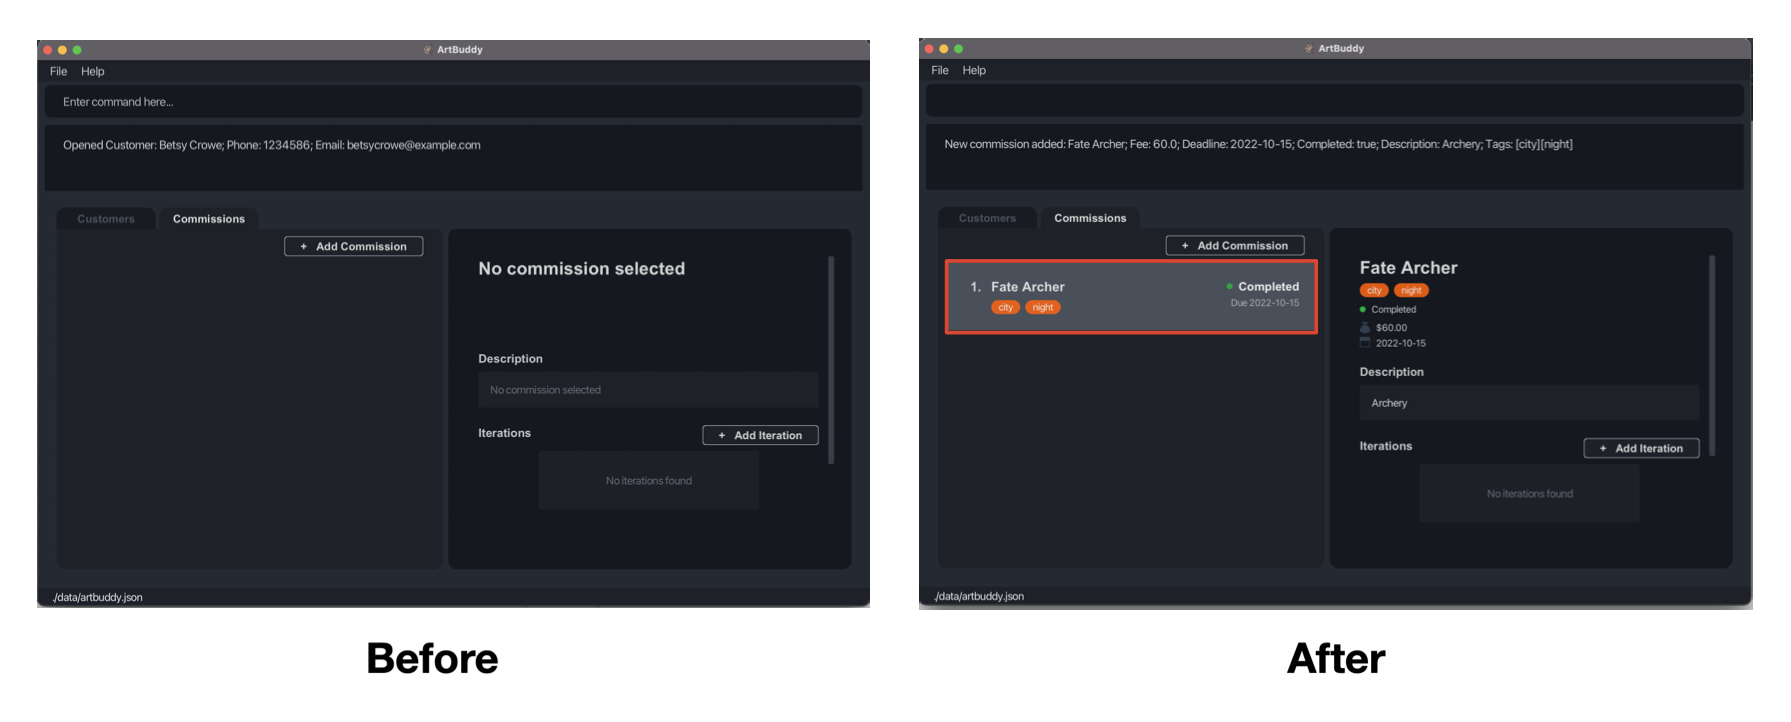
Good job! Now that you’re getting the hang of things, check out our Features section to explore the full capabilities of ArtBuddy.
Features
Dive right into ArtBuddy’s full list of features. This section guides you through all of ArtBuddy’s commands.
For ease of reference, similar features are grouped into the individual subsections listed below:
- Customer related commands
- Commission related commands
- Iteration related commands
- Statistical commands
- Miscellaneous
Customer related commands
Customers are at the heart of ArtBuddy. ArtBuddy will help you keep track of all your customers and their details so you never have to lose a contact again.
ArtBuddy offers the following commands to help you manage your customers:
- Viewing a customer:
opencus - Adding a customer:
addcus - Editing a customer:
editcus - Deleting a customer:
delcus
Customers stored in ArtBuddy have the following details:
| Detail | Explanation | Constraints |
|---|---|---|
| Name | The name of the customer (case sensitive, and must be unique) | Alphanumeric and space characters |
| Phone number | The phone number of the customer | At least 3 digits |
| The email of the customer | Email format with at sign and domain name | |
| Optional address | The address of the customer | See Appendix: Limitations of no-constraint text inputs |
| Optional tags | A customer may be tagged with any number of tags (including 0) which can be used to help categorise your customers | Each tag at most 25 alphanumeric and space characters |
Viewing a customer: opencus
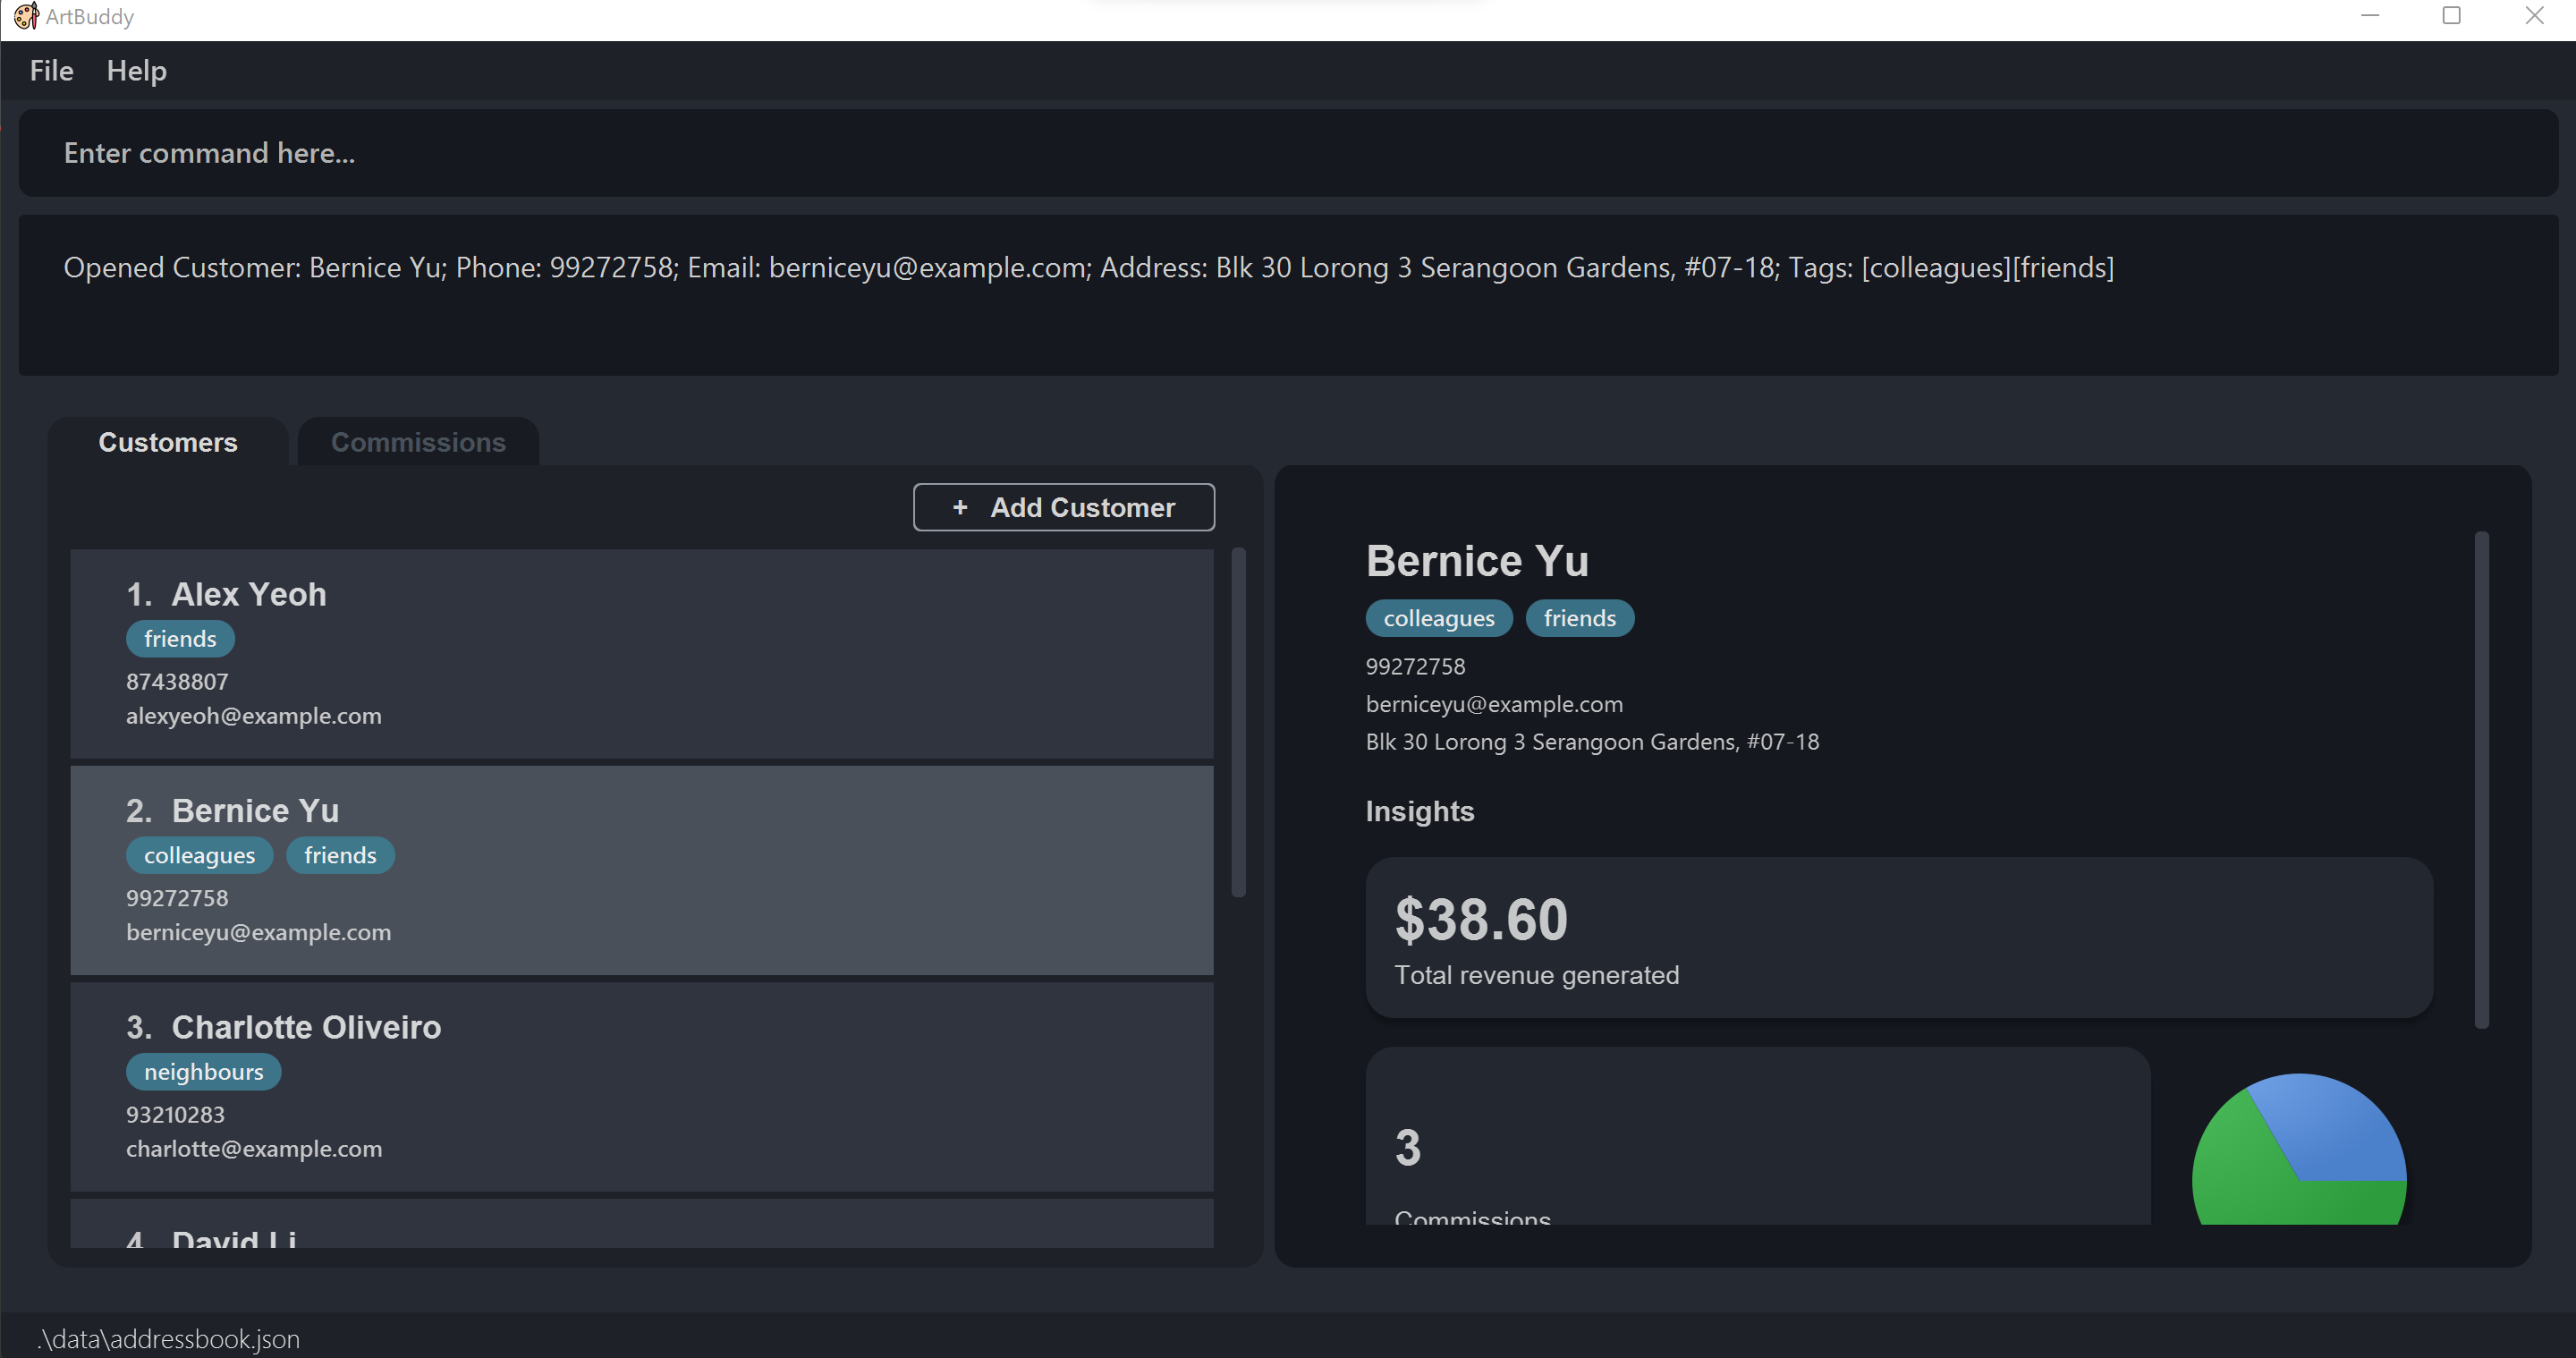
Opens a customer at INDEX and shows customer details with various analytics you can use. The commissions tab will be updated to show the commissions made by the customer you selected. If no INDEX is provided, you will just switch to the customers tab.
Format: opencus [INDEX]
Examples:
-
opencus 2Shows details about the second customer and updates the commissions tab with second customer’s commissions.
Adding a customer: addcus
Adds a customer to ArtBuddy.
Format: addcus n/NAME p/PHONE_NUMBER e/EMAIL [a/ADDRESS] [t/TAG]...
Examples:
-
addcus n/John Doe p/98765432 e/johnd@example.com a/John street, block 123, #01-01 t/animal cartoons t/vipCreates the customer entry for John Doe with his details including multiple tags. -
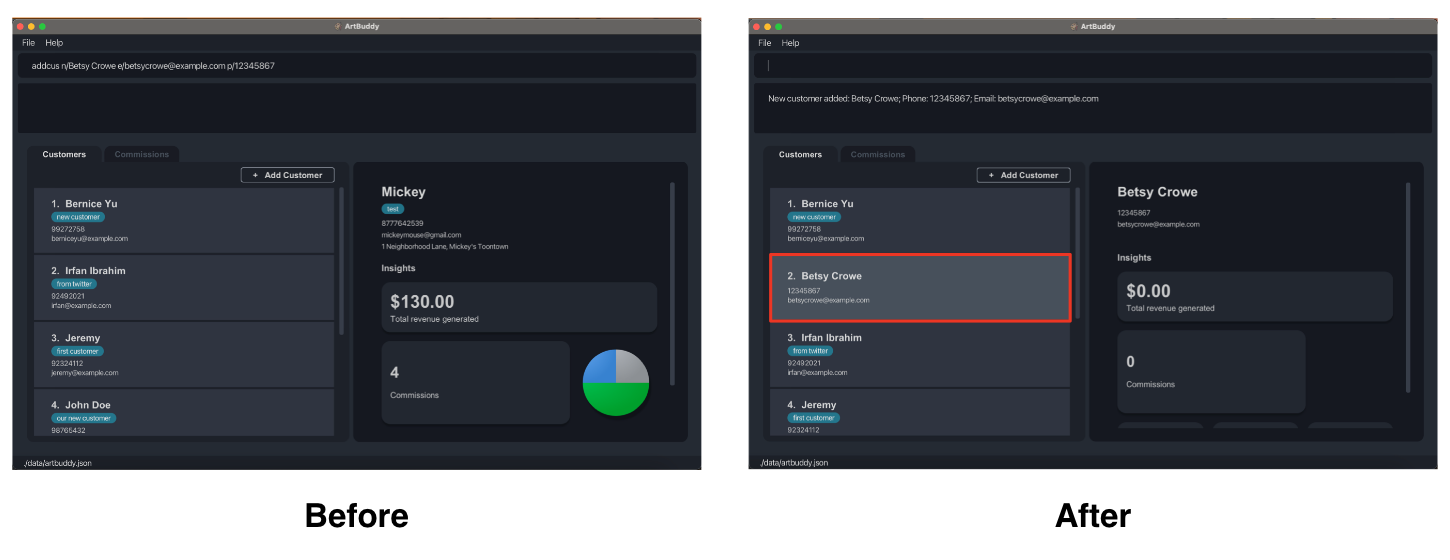
addcus n/Betsy Crowe e/betsycrowe@example.com p/12345867Creates the customer entry for Betsy Crowe with her email and phone number.
Editing a customer: editcus
Edits the details of the customer at INDEX.
Format: editcus INDEX [n/NAME] [p/PHONE] [e/EMAIL] [a/ADDRESS] [t/TAG]...
- At least one field to edit must be provided.
Examples:
-
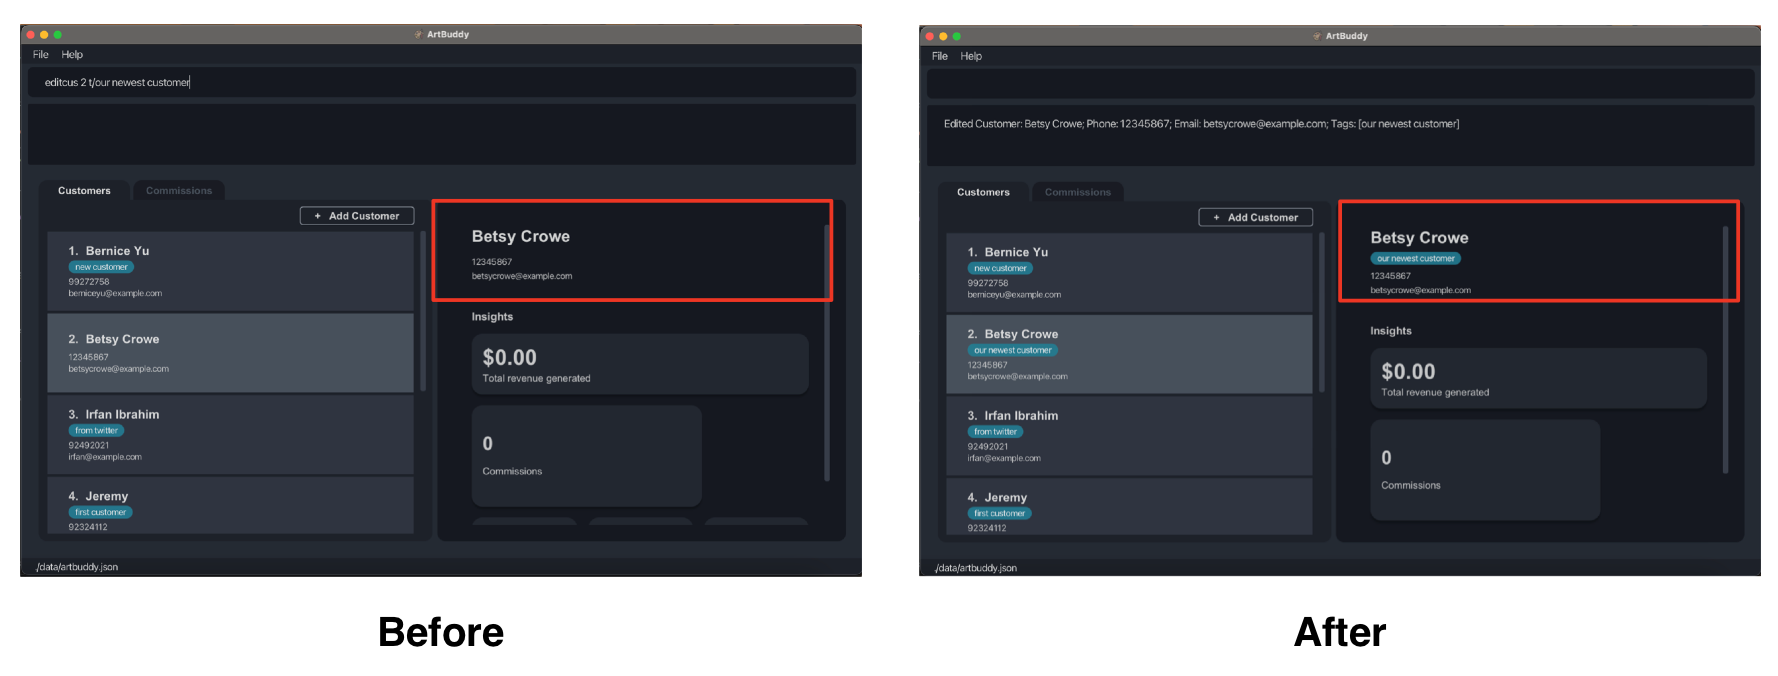
editcus 1 p/91234567 e/johndoe@example.comEdits the first customer’s phone number and email.
Deleting a customer: delcus
Deletes the customer at INDEX from ArtBuddy.
Format: delcus INDEX
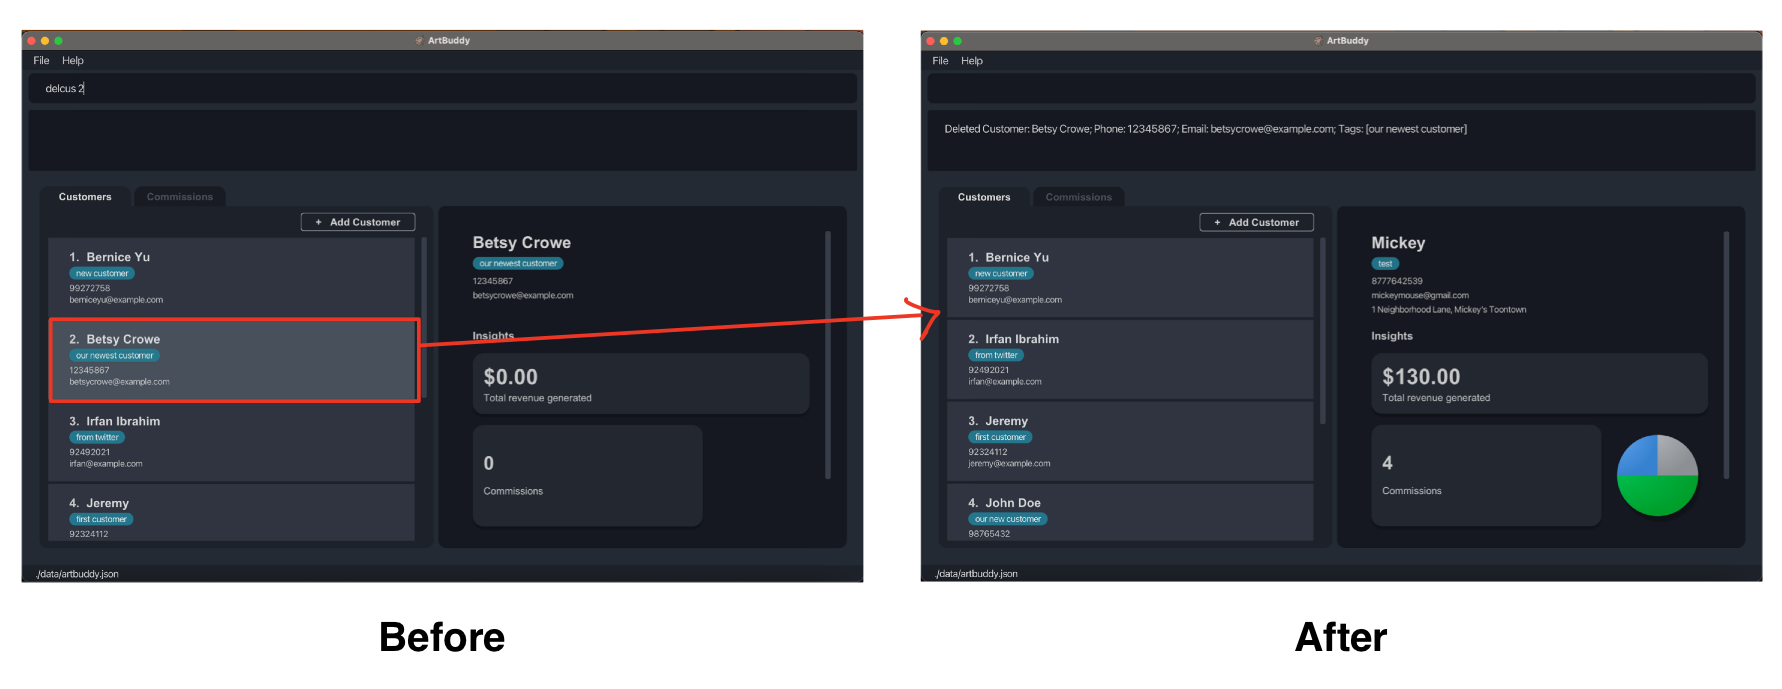
Examples:
-
delcus 2Deletes the 2nd customer in the ArtBuddy and all commissions made by the customer.
Commission related commands
Being able to keep track of your customers is great, but that’s not enough. Ever missed a deadline for a commission? Well, not anymore. With ArtBuddy’s ability to help you track commissions made by each customer, say goodbye to missed deadlines.
ArtBuddy offers the following commands to help you manage your commissions:
- Viewing a commission:
opencom - Adding a commission:
addcom - Editing a commission:
editcom - Deleting a commission:
delcom
Commissions stored in ArtBuddy have the following details:
| Detail | Explanation | Constraints |
|---|---|---|
| Title | The name of the commission (case sensitive, and must be unique) | Alphanumeric and space characters |
| Deadline | The due date of the commission |
YYYY-MM-DD format (four-digit year, followed by a 2-digit month, and 2-digit day number; so “7 November 2022” should be passed as 2022-11-07) |
| Status | The completion status of the commission |
y, yes, t, true for complete status n, no, f, false for incomplete status |
| Optional description | A description of the commission (for instance, the commission requirements) | See Appendix: Limitations of no-constraint text inputs |
| Optional tags | A commission may be tagged with any number of tags (including 0) which can be used to help categorise your commissions | Each tag at most 25 alphanumeric and space characters |
Viewing a commission: opencom
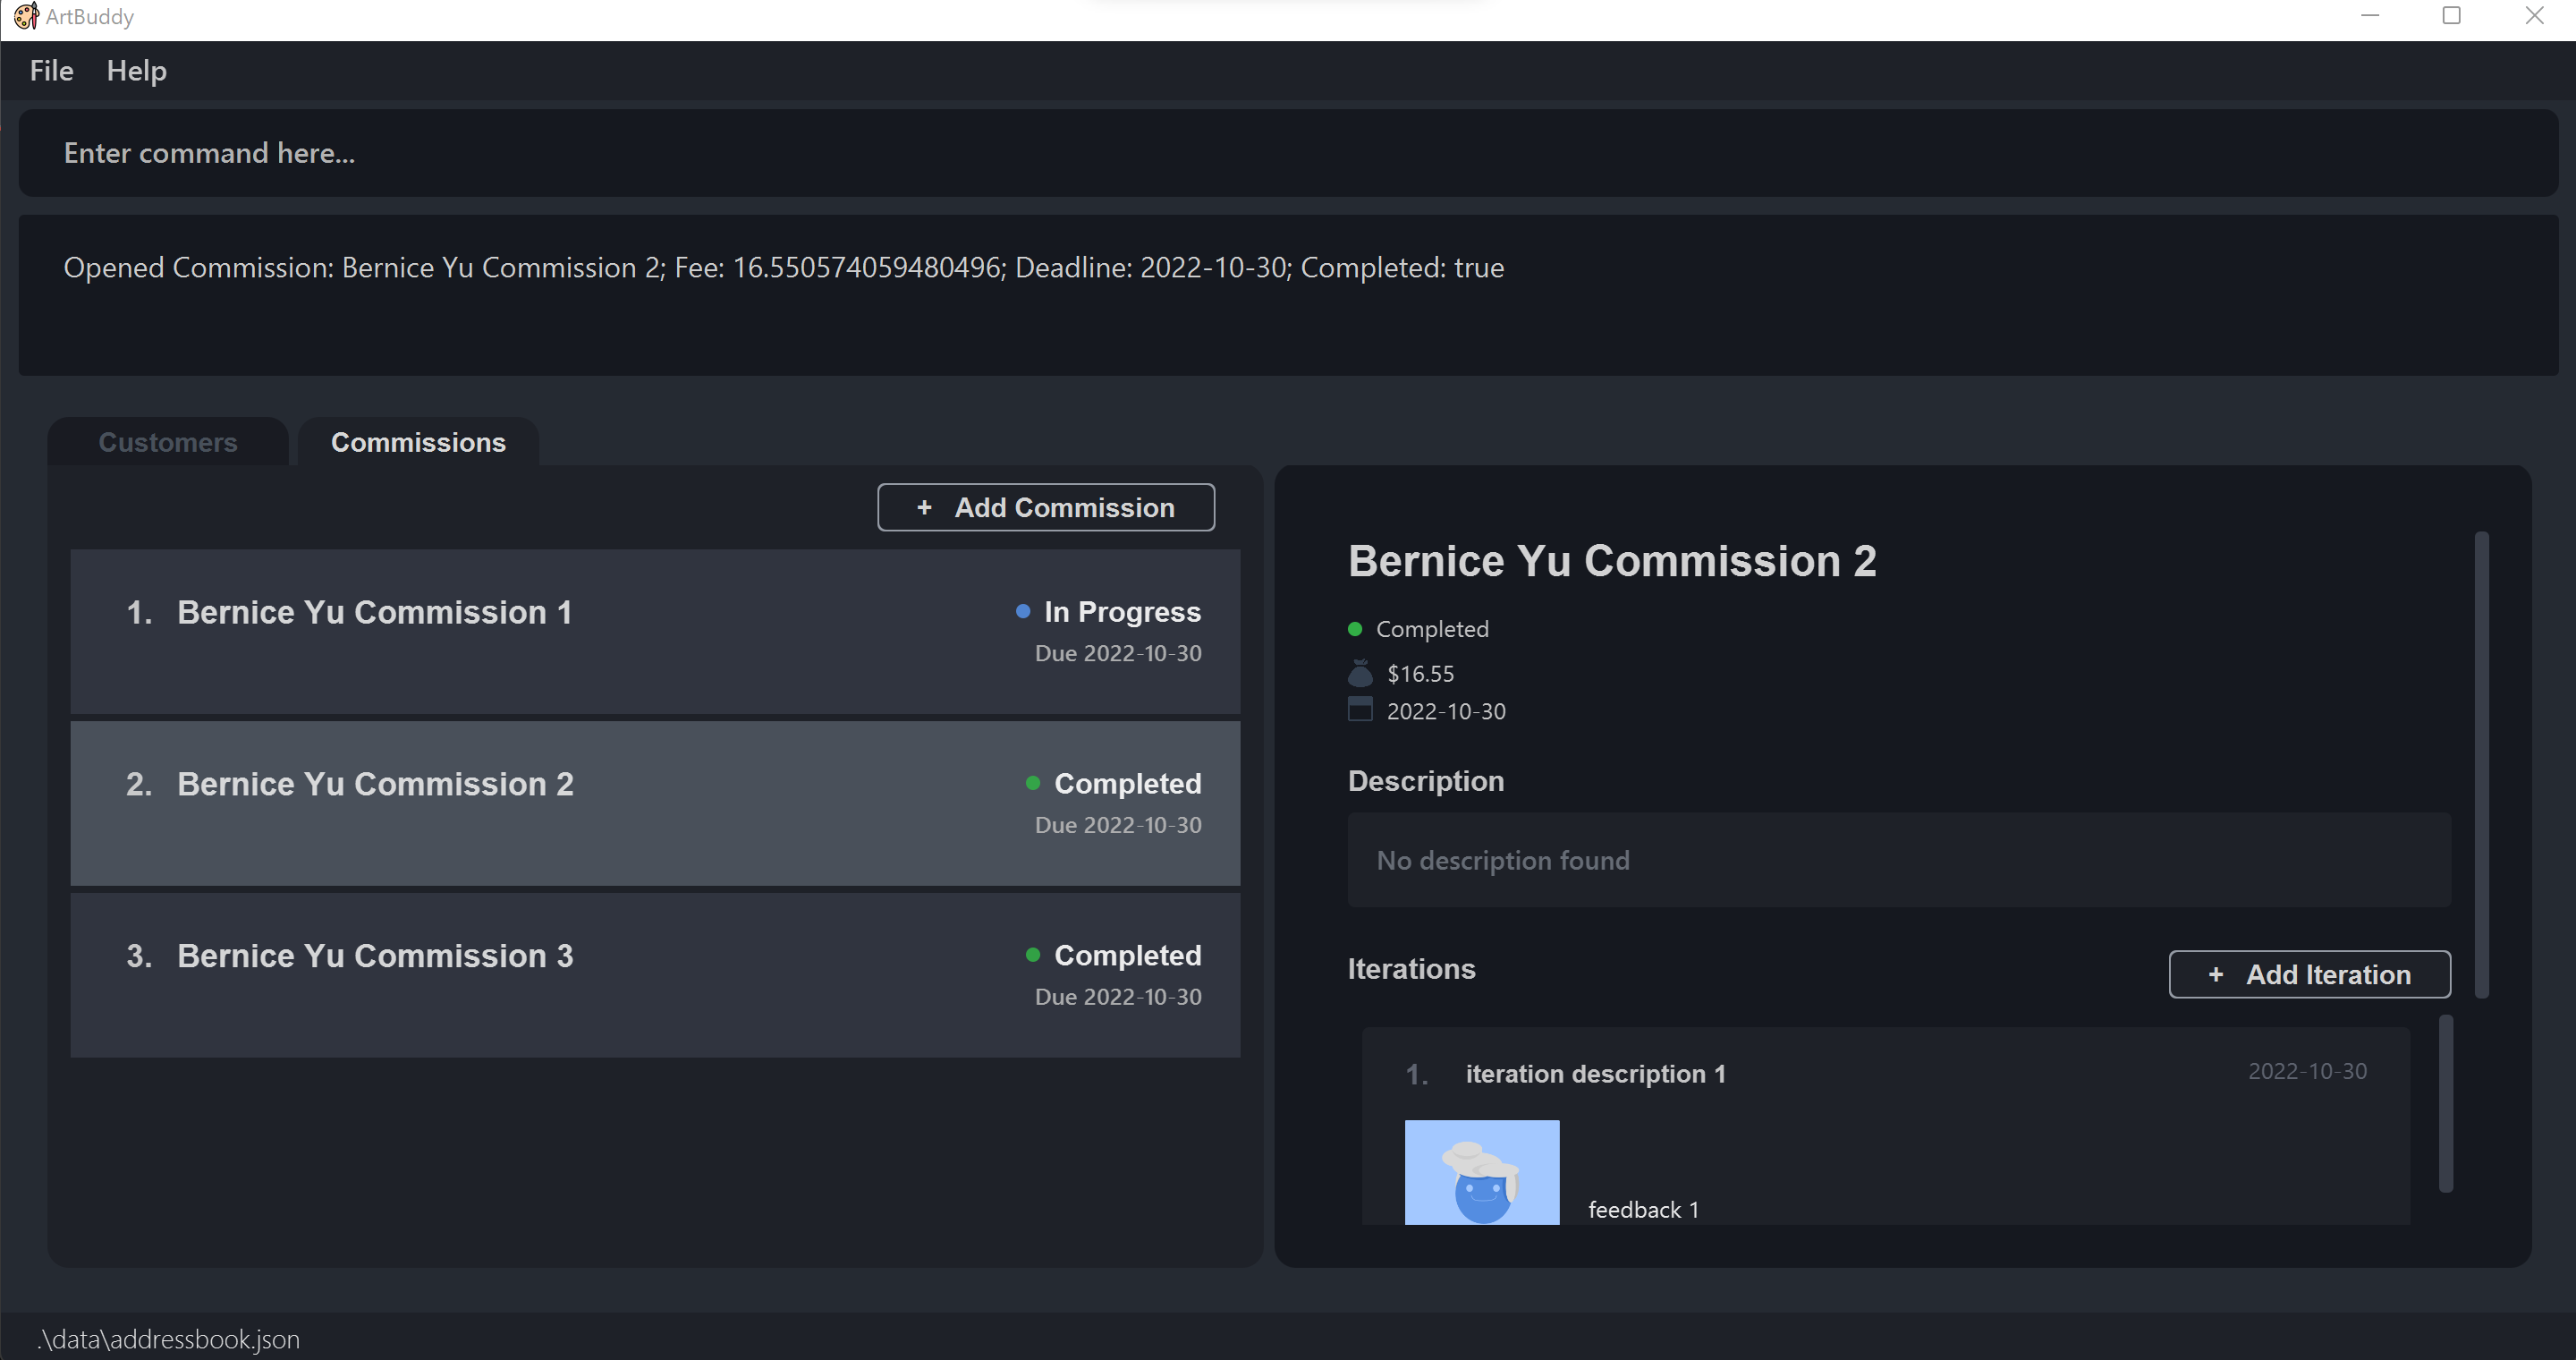
Opens a commission at INDEX and shows its relevant details and image. If no INDEX is specified, you will just switch to the commissions tab.
Format: opencom [INDEX]
Examples:
-
opencomSwitches to commissions tab. -
opencom 2When you run anopencomcommand with indexopencom 2, you should be switched to the commissions tab to view commission details.
Adding a commission: addcom
Adds a commission to the currently opened customer.
Format: addcom n/TITLE f/FEE d/DEADLINE s/STATUS [p/DESCRIPTION] [t/TAG]...
- Fee is the amount you are charging the customer for this commission.
- Note: Though there is no limit to the number of decimal places for input, only up to two decimal places will be displayed on the graphical interface.
- Status states if the commission is done or not and can only take
y,yes,t,truefor complete status andn,no,f,falsefor incomplete status. It is case-insensitive.
Examples:
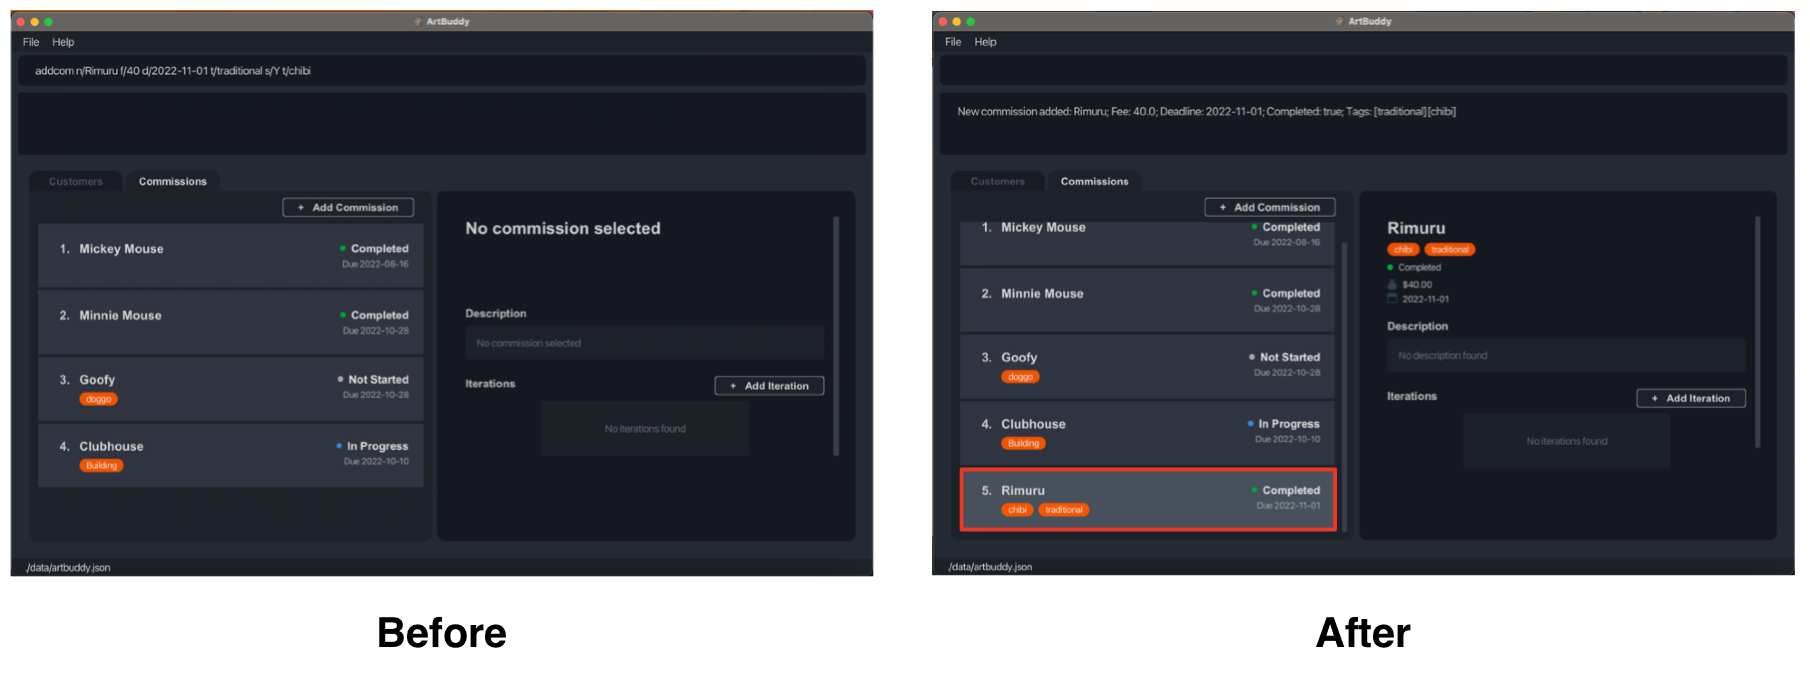
-
addcom n/Rimuru f/40 d/2022-11-01 t/traditional s/Y t/chibicreates the commission entry titled “Rimuru” with the given fee, due date, completion status and tags. -
addcom n/Fate Archer f/60 d/2022-10-15 s/false p/Archery t/night t/citycreates a commission entry titled “Fate Archer” with the given fee, due date, completion status, description and tags.
Editing a commission: editcom
Edits a commission at INDEX.
Format: editcom INDEX [n/TITLE] [f/FEE] [d/DEADLINE] [s/COMPLETION STATUS] [p/DESCRIPTION] [t/TAG]
- At least one field to edit must be provided.
Example:
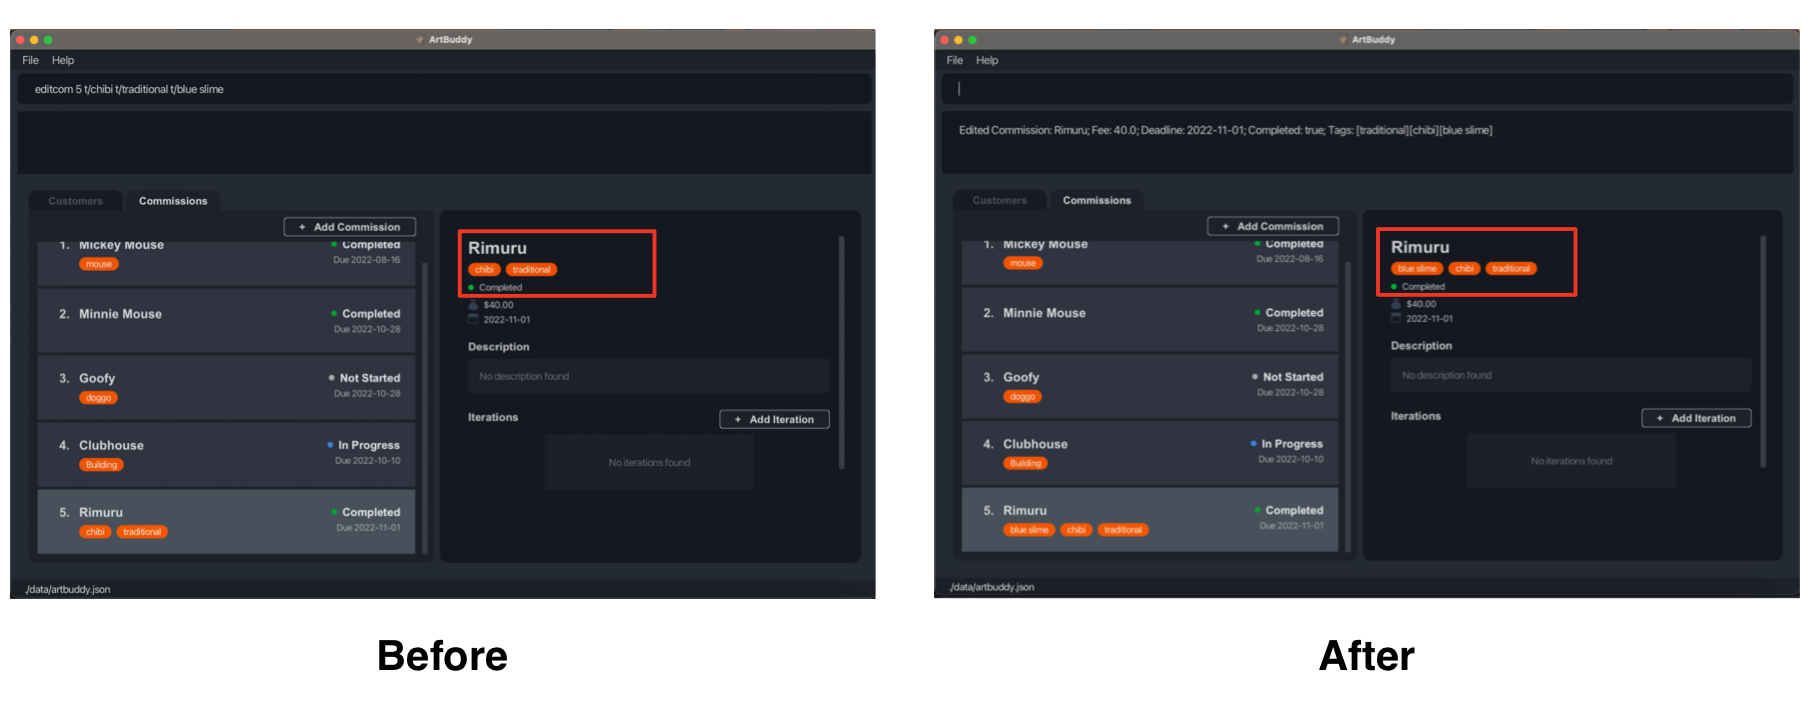
-
editcom 1 n/Tokyo Ghoul Kaneki f/50 d/2022-10-10 s/False p/Unfamiliar, I will need to do up a reference board first. t/digital t/neonEdits the first commission to have the above fields. -
editcom 2 s/TrueEdits the second commission to be completed.
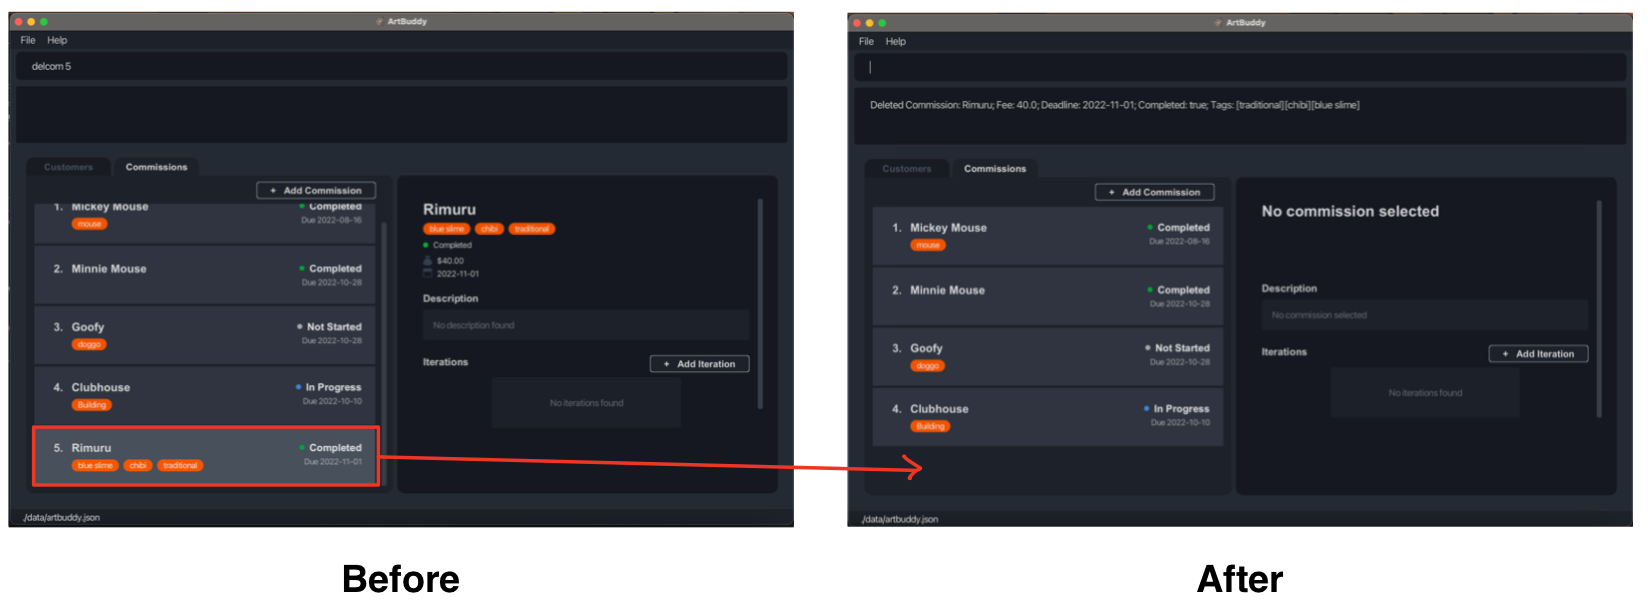
Deleting a commission: delcom
Deletes a commission at INDEX and iterations related to the commission.
Format: delcom INDEX
Example:
delcom 14
Iteration related commands
Each piece of art represents a journey of growth. From ideation, sketches, drafts, to constant refinements. ArtBuddy wants to help you capture this process. That’s why we created iterations, just for you.
Each iteration serves as a ‘bookmark’, representing a version of your artwork as you work on perfecting your commission.
ArtBuddy offers the following commands to help you manage your iterations:
- Adding iteration to a commission:
additer - Editing an iteration from commission:
edititer - Deleting an iteration from commission:
deliter
Iterations stored in ArtBuddy have the following details:
| Detail | Explanation | Constraints |
|---|---|---|
| Description | Describes the progress that was made in the iteration (case sensitive, and must be unique) | See Appendix: Limitations of no-constraint text inputs |
| Date | Records the date tied to the iteration (for instance, when the iteration was created) | In YYYY-MM-DD format (four-digit year, followed by a 2-digit month, and 2-digit day number; so “7 November 2022” should be passed as 2022-11-07) |
| Image | A picture that captures how the commission looks like in the current iteration | File path (Refer to Appendix for more info) |
| Feedback | Feedback attached to the current iteration (for instance, areas for improvement) | See Appendix: Limitations of no-constraint text inputs |
Adding an iteration to a commission: additer
Adds an iteration to the selected commission. This can be done either by the CLI or GUI.
Adding by the Command-Line Interface
Format: additer n/DESCRIPTION d/DATE p/FILEPATH f/FEEDBACK
- The file path specified should be an absolute path from your root directory. If you’re not familiar with file paths and root directories, you might find the explanation in the Appendix helpful.
- The command requires a commission to be selected.
- Currently, only image file types .png, .jpg, .bmp and .gif are supported.
Example:
Note that this example will probably not work for you because you’ll need to replace the file path with a valid file path.
-
additer n/First Draft d/2022-10-28 p//Users/John/Downloads/Draft 1.png f/Looks greatcreates an iteration with the description “First Draft”, date 28 October 2022, image at file pathp//Users/John/Downloads/Draft 1.png, and feedback “Looks great”.
Adding by Graphical Interface
-
Click on the Add Iteration button inside the Commission you wish to add the iteration to.
-
Fill in the details of the new iteration in the window that pops up.
- An image can be added to the iteration by selecting a file in your file manager by clicking on the Add Image button, or by dragging and dropping an image to the grey image drop area.
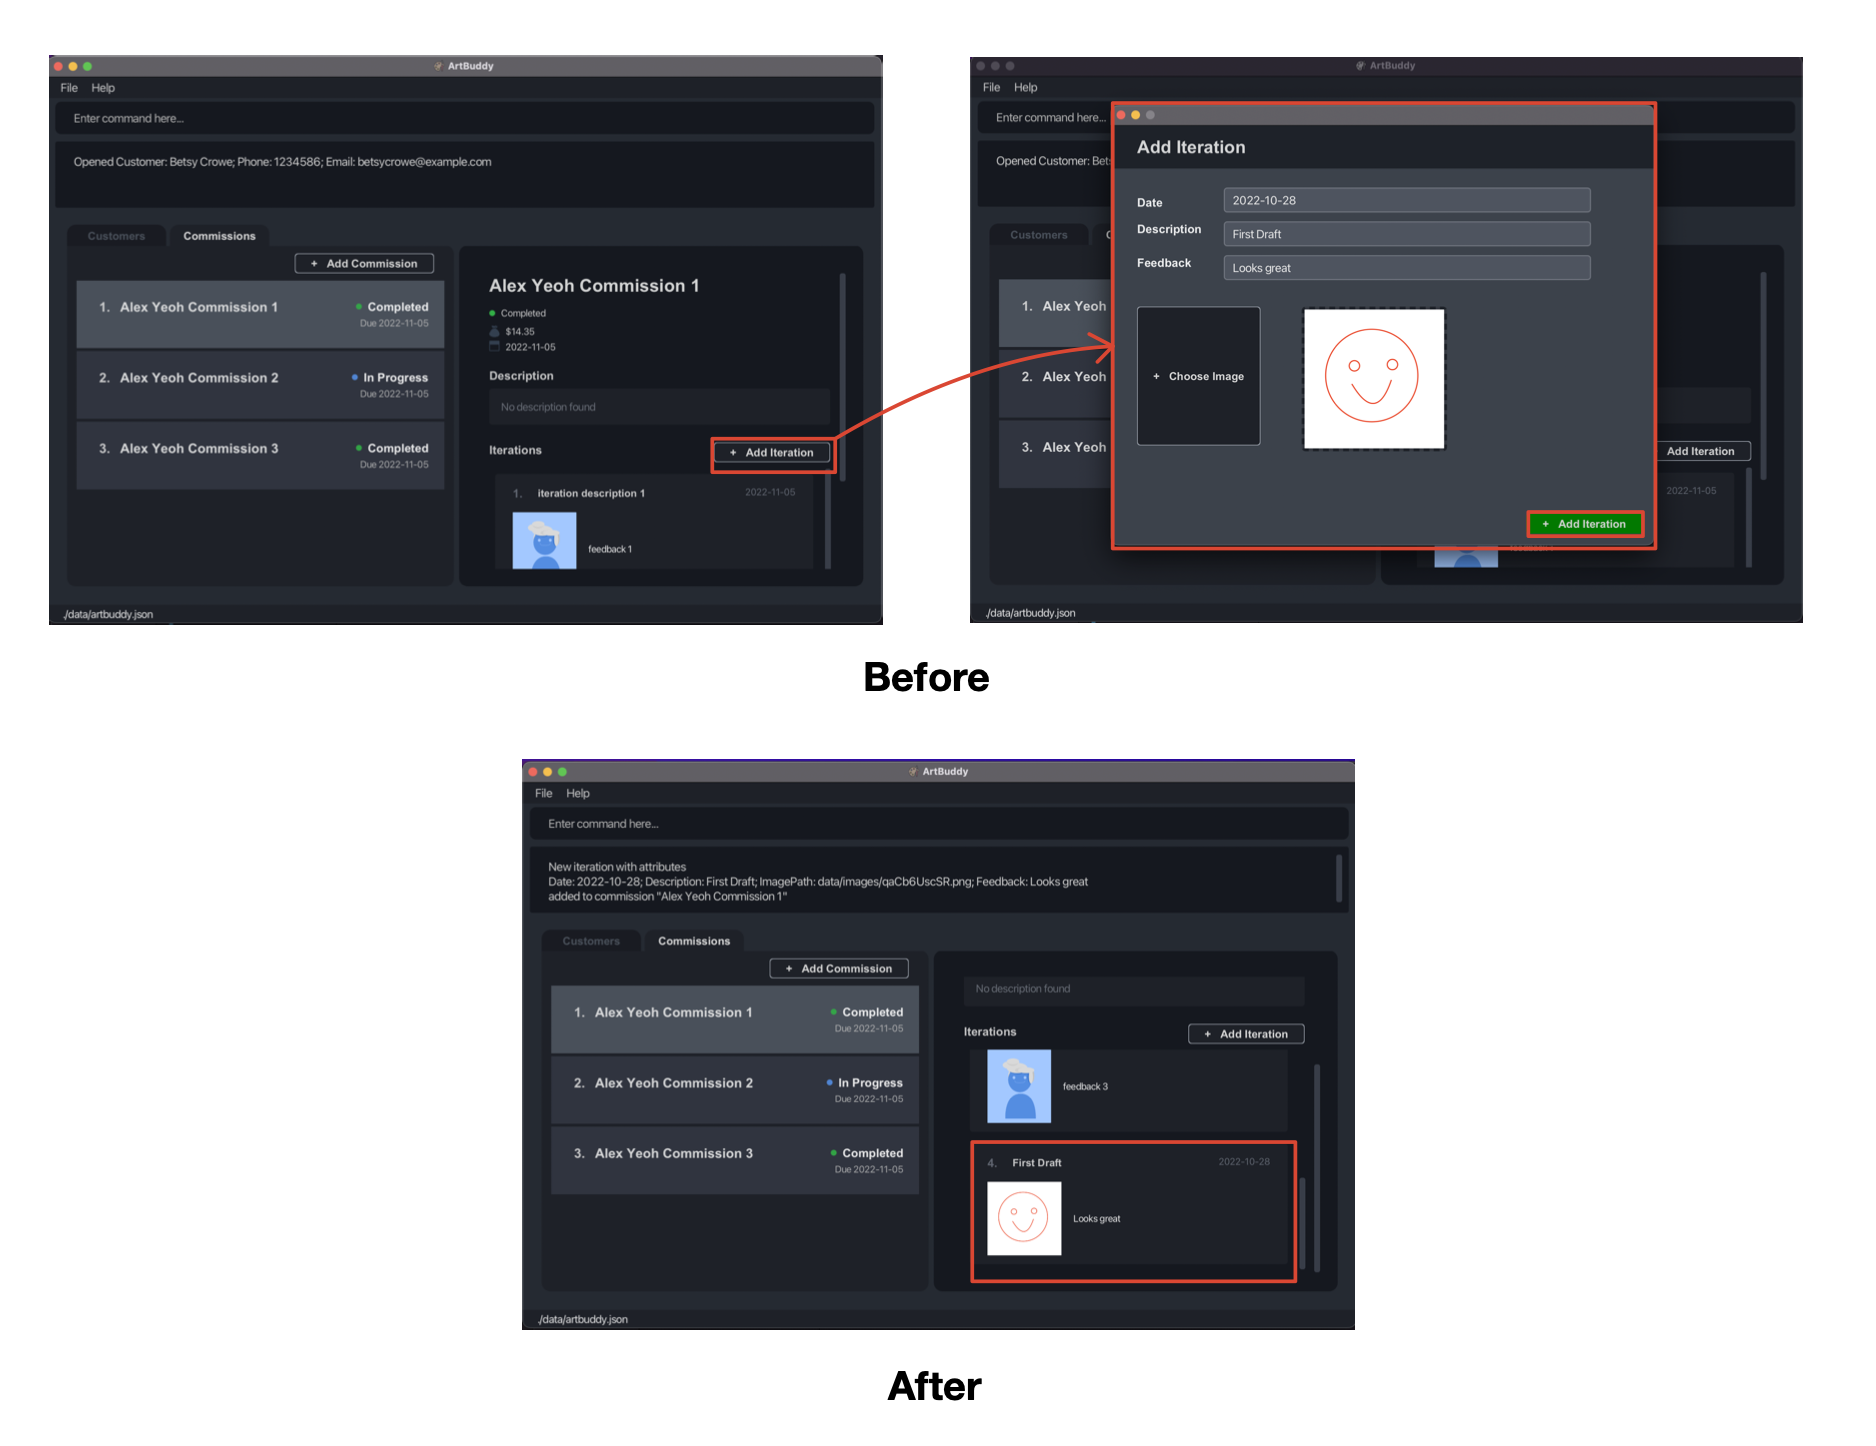
ArtBuddy creates a copy of each file you upload. This means that you can edit, delete, or move your original copy of the file without affecting the uploaded image on ArtBuddy.
Editing an iteration from commission: edititer
Edits an iteration at INDEX in the selected commission.
Format: edititer INDEX [n/DESCRIPTION] [d/DATE] [p/FILEPATH] [f/FEEDBACK]
- The command requires a commission to be selected.
- At least one field to edit must be provided.
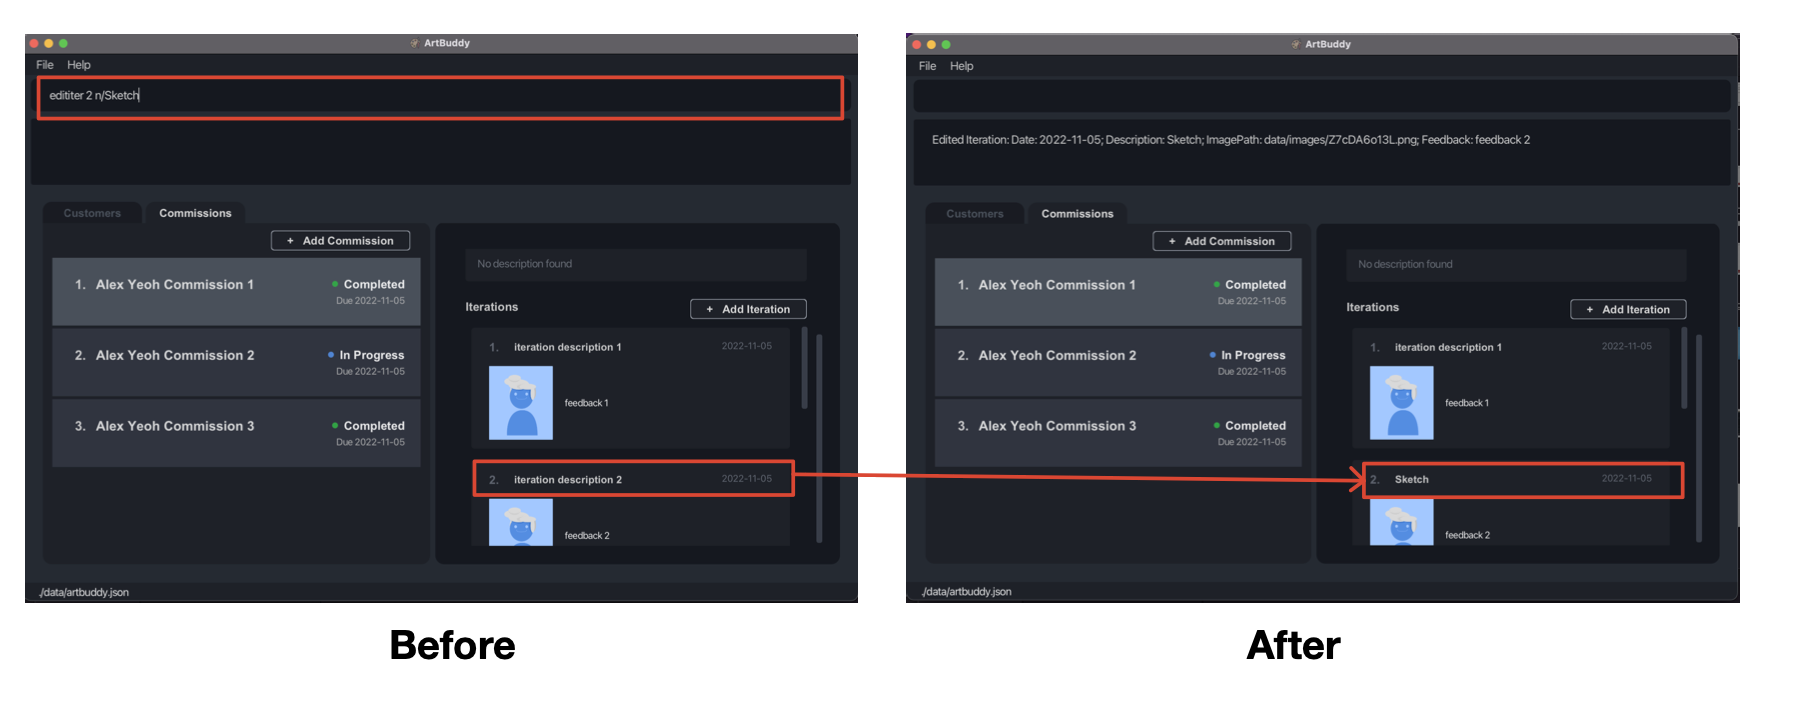
Example:
-
edititer 2 n/SketchEdits the description of the second iteration in the currently selected commission.
Deleting an iteration from commission: deliter
Deletes an iteration at INDEX from the selected commission.
Format: deliter INDEX
- The command requires a commission to be selected.
- You may want to note that your local copy of the image will not be deleted.
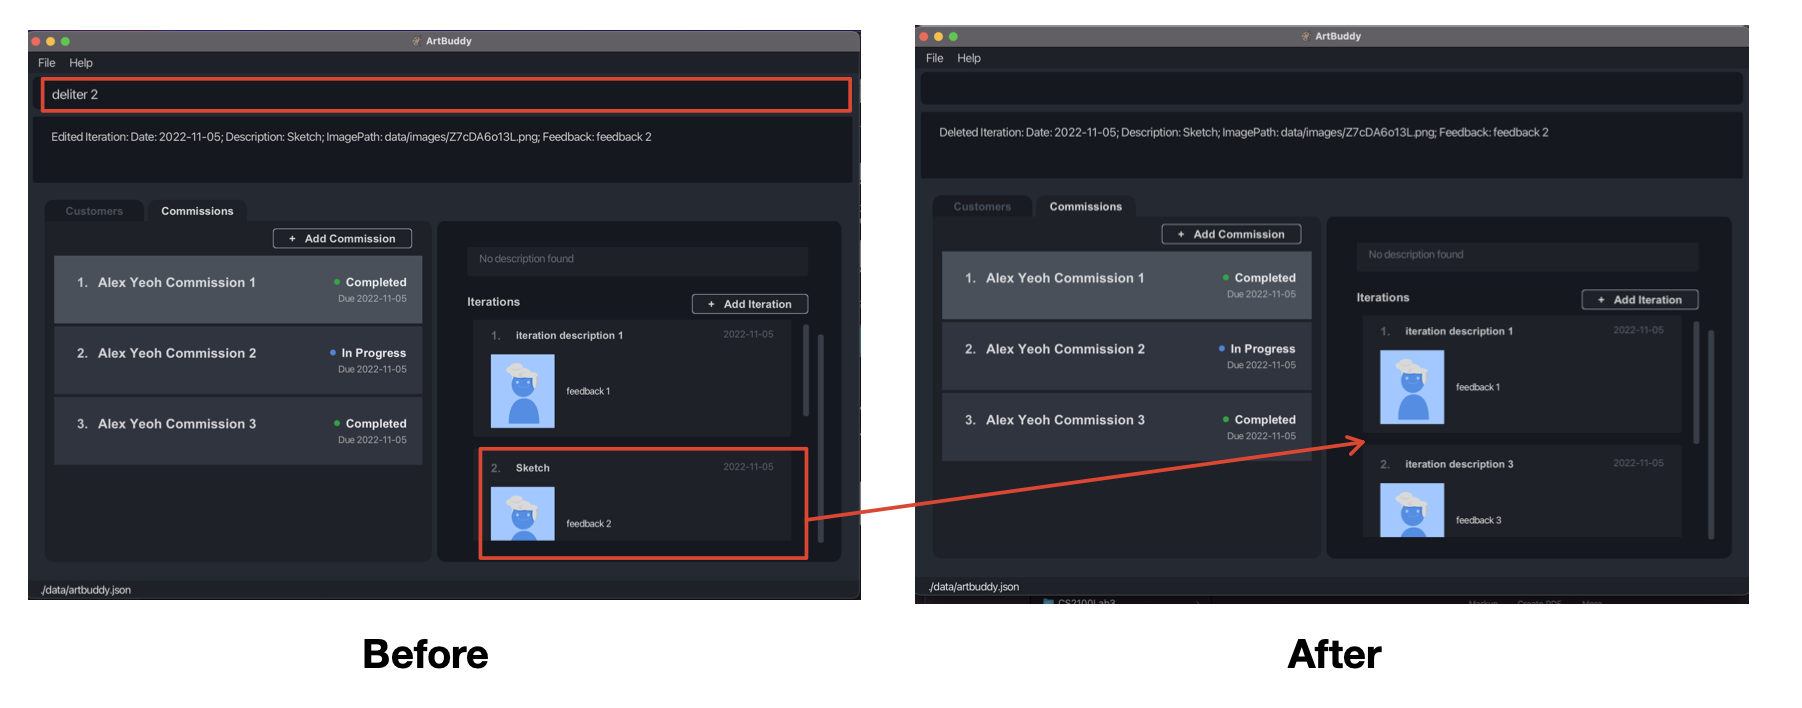
Example:
-
deliter 2Deletes the second iteration of the currently selected commission.
Statistical commands
Supercharge your business with ArtBuddy’s integrated statistical commands. It’s now possible to leverage on your business data at the snap of your fingers.
ArtBuddy offers the following commands to help you navigate through and make sense of all your data:
- List all the customers:
list - Find a customer:
find - Sorting the customer list:
sortcus - List the commissions:
listcom - Viewing all commissions:
allcom - Find a commission:
findcom
List all the customers: list
Lists all the customers.
Format: list

Find a customer: find
Finds all the customers who satisfy keyword matching in the name and tag filters. The tag filter more specifically will include customers who contain all tags under -all and at least one of the tags under -any.
Format: find [k/KEYWORDS]... -all [t/TAGS]... -any [t/TAGS]...
- The keywords, all, and any filters are all optional and can be omitted, but at least one should exist.
Examples:
-
find k/KevinFinds customers who have the name Kevin. -
find -all t/friend t/colleagueFinds customers who are tagged bothfriendandcolleague. -
find -any t/friend t/colleagueFinds customers who are either taggedfriendorcolleague.

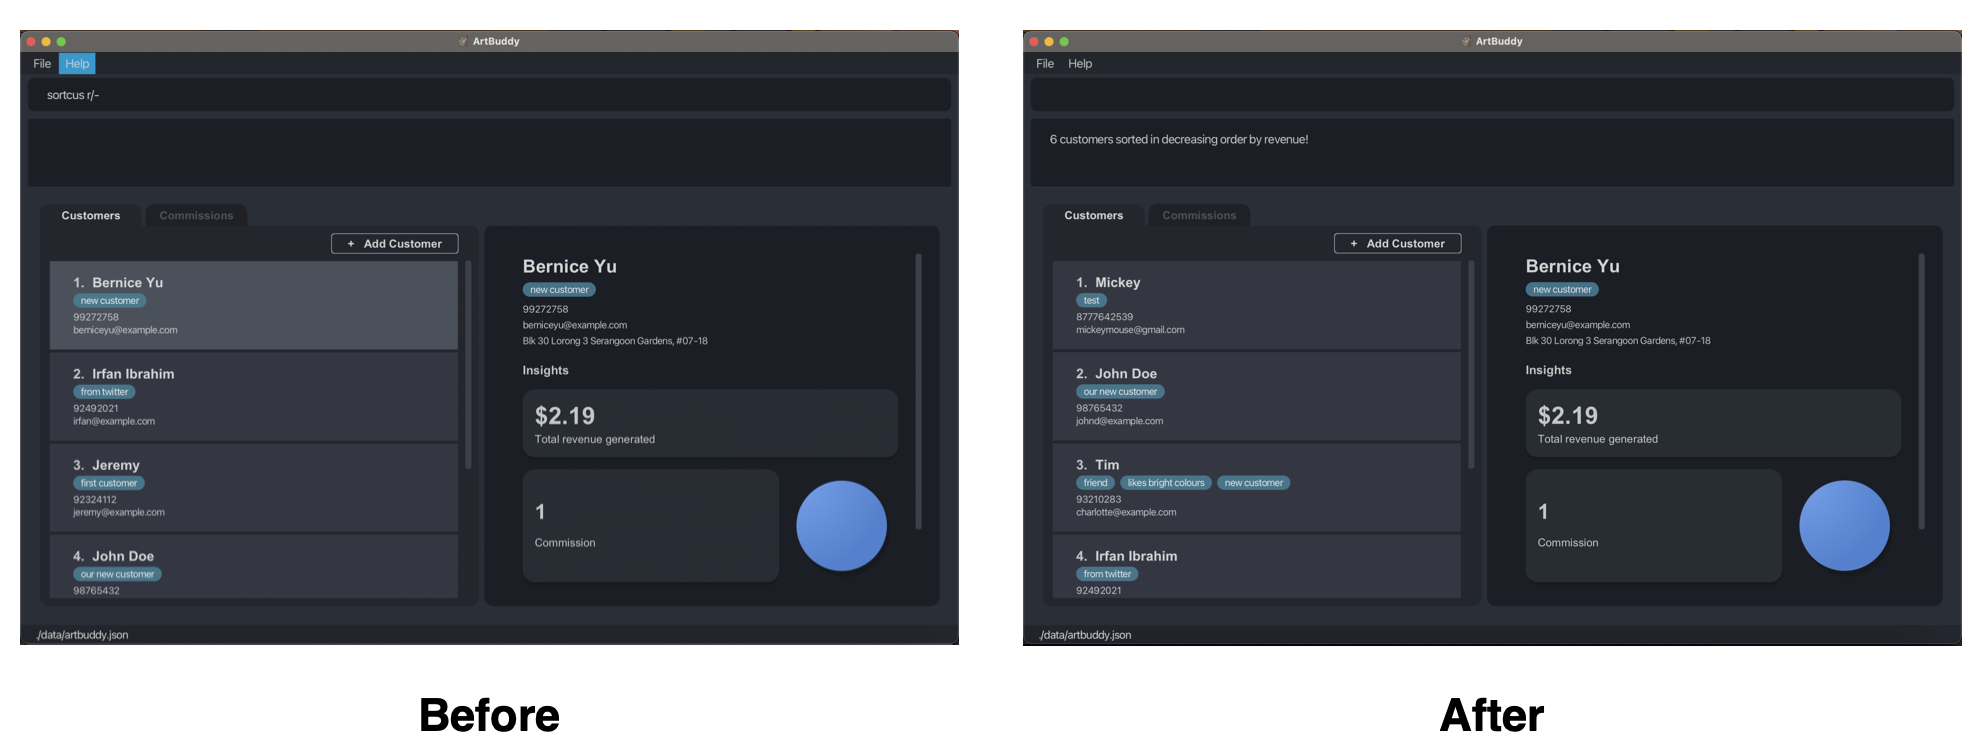
Sorting the customer list: sortcus
Sorts the displayed customer list by one of the following options:
Prefix:
-
n(name) -
d(latest commission date) -
c(commission count) -
r(revenue) -
a(active commissions count)
Suffix: + (increasing) or - (decreasing)
Format: sortcus PREFIX/SUFFIX
Examples:
-
sortcus r/+Sorts your customer list by the total revenue generated from each customer in increasing order.
List the commissions: listcom
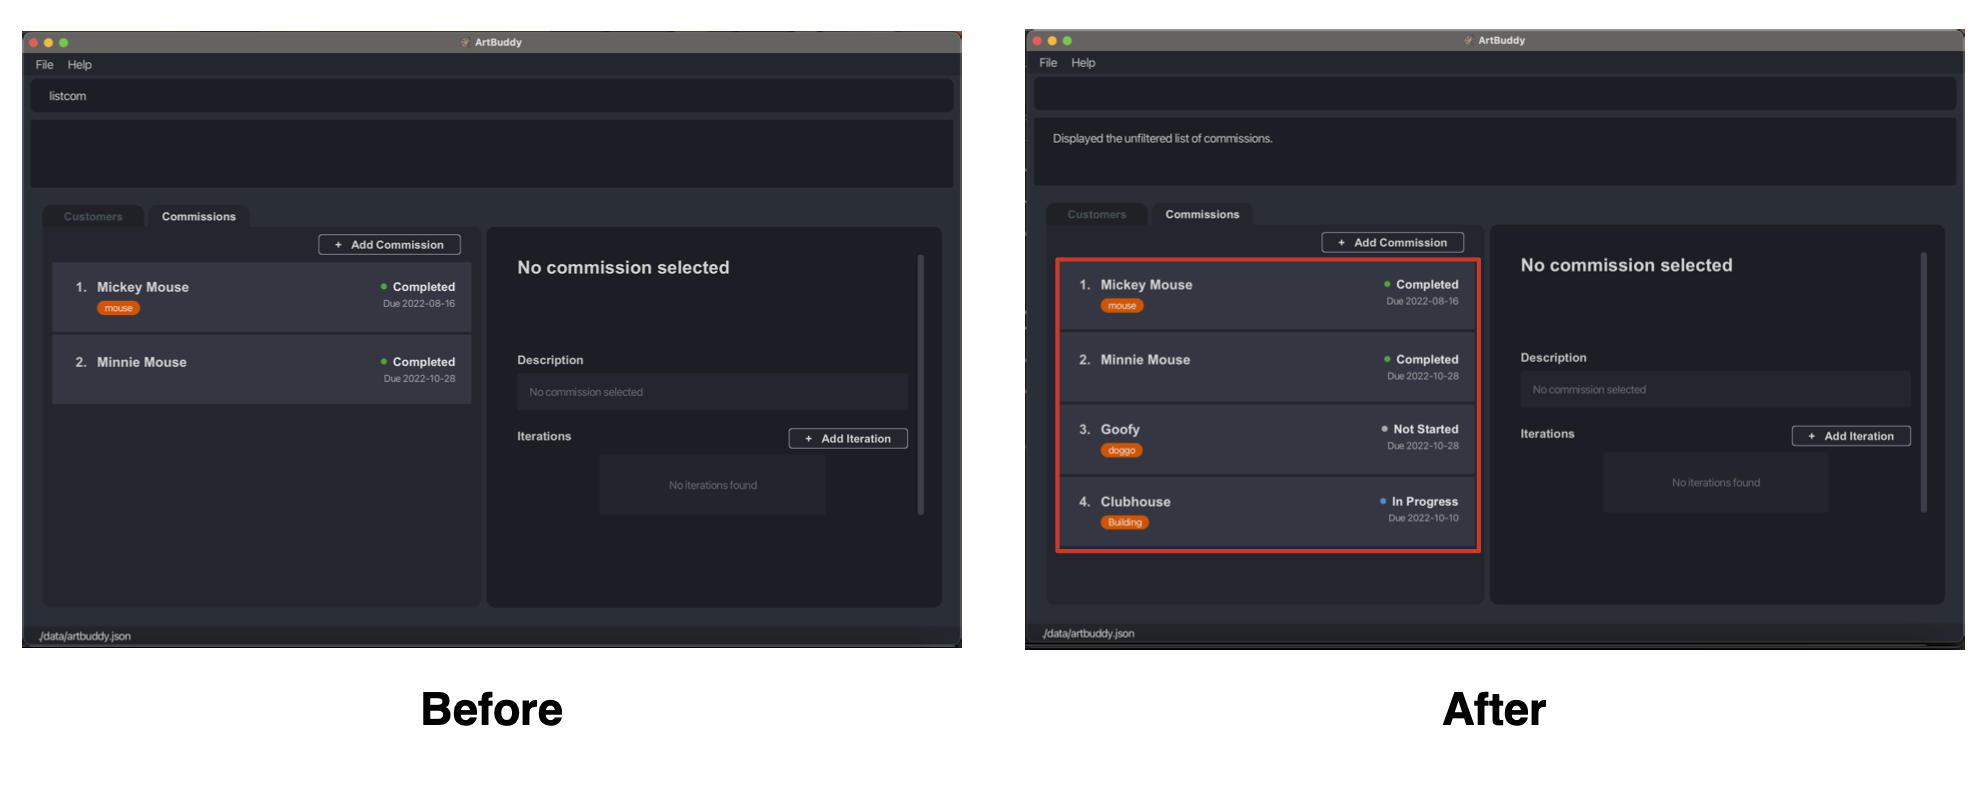
Lists all the commissions made by the selected customer.
Format: listcom
Viewing all commissions: allcom
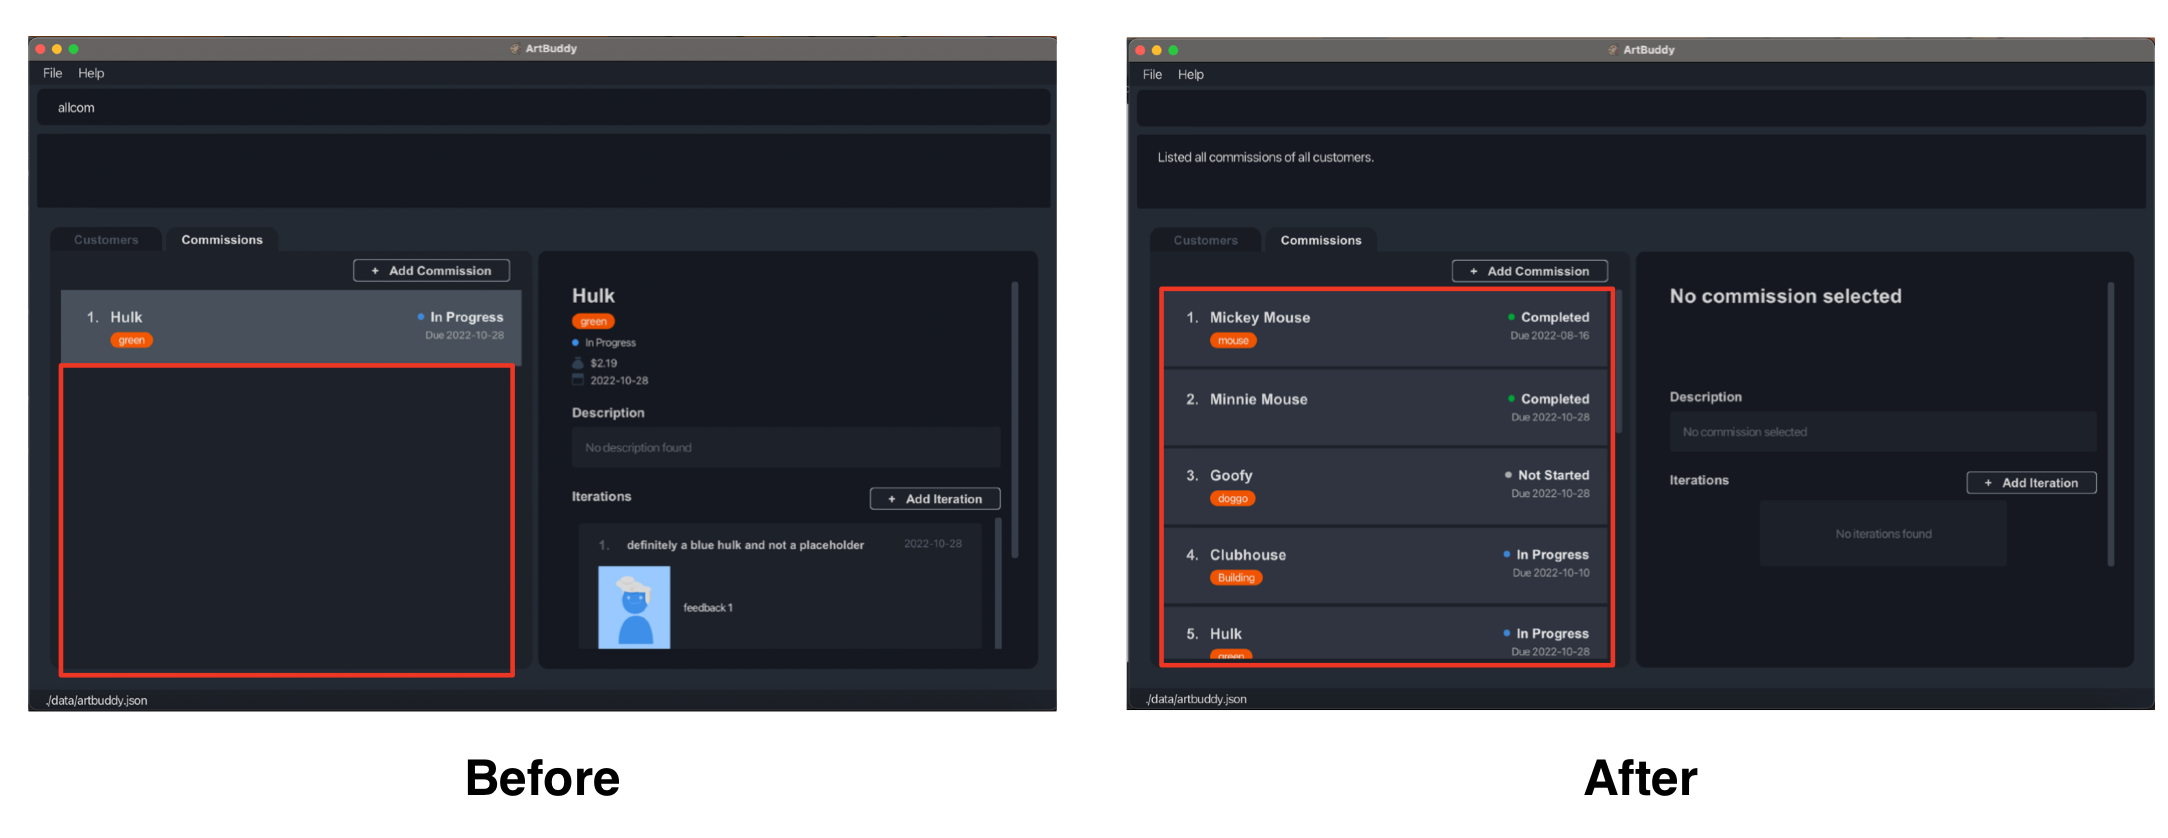
Displays all your commissions made by all customers in ArtBuddy.
Format: allcom
After running allcom, you should be switched to the commissions tab to view all commissions.
To view the commissions for a specific customer, return to the customer list (opencus) and select the customer from the list (opencus INDEX).
Find a commission: findcom
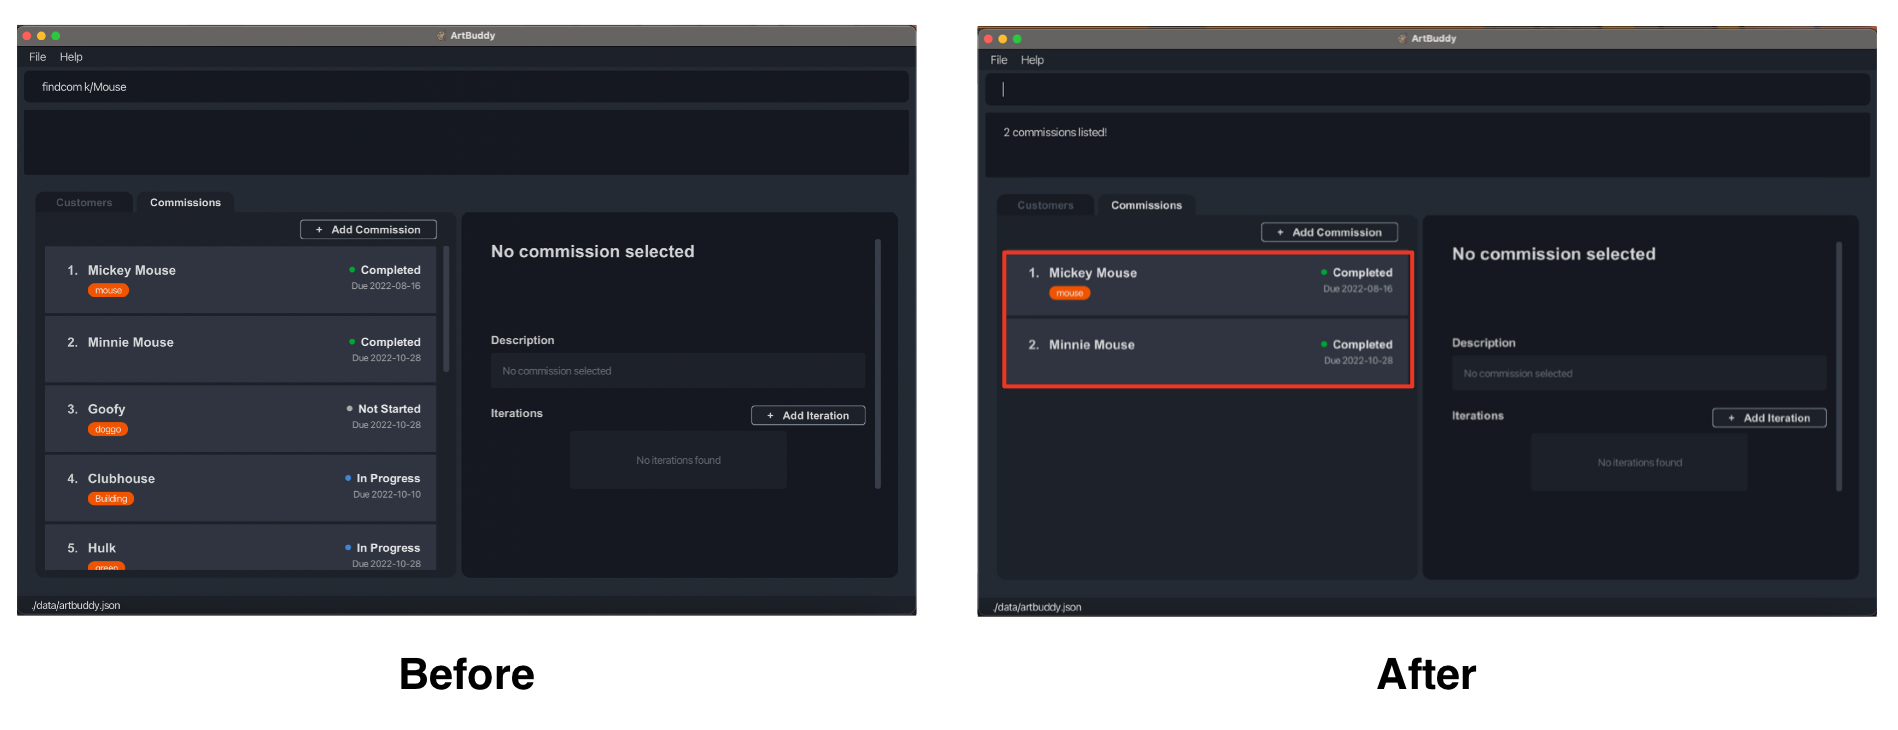
Finds all the commissions in the list which satisfies your search query. You can also search for commissions by their tags using the -all and -any filters.
Format: findcom [k/KEYWORDS]... -all [t/TAGS]... -any [t/TAGS]...
- The keywords, all, and any filters are all optional and can be omitted, but at least one should exist.
Examples:
-
findcom k/Tree PaintingFinds commissions which have the titleTree Painting. -
findcom -all t/oil painting t/canvasFinds commissions which are tagged bothoil paintingandcanvas. -
findcom -any t/oil painting t/canvasFinds commissions who are either taggedoil paintingorcanvas.
Miscellaneous
Viewing help: help
Shows you a message explaining how to access the help page.

Format: help
Clearing all the customers: clear
Clears all your customers from ArtBuddy, including their commissions and iterations.
Exiting the program: exit
Exits the program.
Format: exit
Appendix
Saving the data
ArtBuddy data are saved in the hard disk automatically after any command that changes the data. There is no need to save manually.
Editing the data file
ArtBuddy data are saved as a JSON file [JAR file location]/data/artbuddy.json. Advanced users are welcome to update data directly by editing that data file.
Further notes on command parameters
- When passing in dates in ArtBuddy as command parameters, they should be formatted in YYYY-MM-DD format.
- This means that if you want to specify ‘4th October 2022’ as a date command parameter, it should be formatted and passed into ArtBuddy as ‘2022-10-04’.
- Something cool about ArtBuddy is that command parameters can be specified in any order!
- This means that if the command specifies
n/NAME p/PHONE_NUMBER, ArtBuddy will also understand the inputp/PHONE_NUMBER n/NAME.
- This means that if the command specifies
- Also, if a parameter is expected only once in the command, but you specified it multiple times, ArtBuddy
will only listen to the last occurrence of the parameter.
- So, if you specify
p/12341234 p/56785678, onlyp/56785678will be taken.
- So, if you specify
- In addition, if you specify command parameters for commands that do not take in parameters (such as
help,list,exitandclear), ArtBuddy simply ignore these extra parameters.- Meaning that the command
help 123, will be interpreted ashelp.
- Meaning that the command
Limitations of no-constraint text inputs
Command parameters like commission descriptions, iteration descriptions and iteration feedbacks that do not impose a constraint on valid text-inputs may face the issue of ambiguity when dealing with inputs containing ‘/’. This is because ‘/’ are also used in ArtBuddy to denote prefixes. As such, descriptions or feedback that contains a prefix will unfortunately not be parsed properly by ArtBuddy. One way you can overcome this by adding a space between the ‘/’s in your input.
Limitations with file paths in CLI
Due to file path naming and the command format, specifying a folder with a folder name that ends with a ‘n’, ‘d’, ‘f’, or ‘p’ would lead to an ambiguous command.
For instance, the command additer d/2022-10-10 n/description f/actual feedback p//test f/image.png is ambiguous
because ArtBuddy does not know whether f/image.png is the feedback parameter specified by the user.
If you wish to upload the image, either rename the folder name, or upload the image by the GUI.
Limitations with images in ArtBuddy
ArtBuddy might not properly handle extreme image sizes. If your images are too small, they might not render properly on ArtBuddy, or might appear very pixelated. If your image is too big (the recommended image size limit is around 5MB), ArtBuddy might not be able to open the image at all, or you may start to experience significant lag with ArtBuddy.
What are file paths and root directories?
Just like how we use addresses to tell specify locations when talking to people, computers do the same! Each file in your computer has a unique address that can be used to identify the exact location in your computer where the file is stored.
The address of each file in your computer can be viewed simply as “directions”, guiding your computer to get to the file. Think about how you would tell someone how to open a specific file in your computer. You would probably say something along the lines of: “Go to the Downloads folder, where you’ll find an Image folder. Click into the Images folder and open the file Draft1.png”.
Well to computers, file paths are just like these guiding instructions that help them locate
a specific file! And your ‘root directory’ is simply a ‘base point’ that stores all your files in
your computer. For most users using a Windows or Mac computer, this root directory is simply
a folder named /.
So what a file path /Users/John/Downloads/Draft 1.png really means is just a way of telling
the computer, “Hey, from my root directory, you’ll find a folder called Users, and in there a
folder called John. Open that up and you’ll find another folder called Downloads.
Open the Downloads folder and you’ll see the file I want called Draft 1.png”.
To easily copy a filepath of a file:
- On Windows, in your File Explorer, hold shift down while you right-click on the file you want. Select the option
Copy as Pathand the filepath of your file will be copied! - On Mac, in your Finder, click on the file you want to select it and press the
Option,Command,Ckeys simultaneously. The filepath of your file is now copied!
Glossary
Not sure what certain terms used in this user guide mean? Don’t worry, we’re here to help!
| Detail | Explanation |
|---|---|
| Commission | A commission is a piece of work that you would receive from a customer. |
| Iteration | An iteration is a version of your commission. You can think of it as a bookmark on your process of making a piece of art. |
| Command Line Interface (CLI) | An application with a Command Line Interface is one where the user interacts with the application using text-inputs. CLI apps typically have no visual interface. |
| Graphical User Interface (GUI) | GUI applications are what you are most probably familiar with. These are applications with visual graphics, where you interact with the system by pressing buttons or clicking on things. |
| Java | Java is a popular programming language which ArtBuddy is written in! |
| JAR file | A JAR file is basically a ZIP file that compresses all of ArtBuddy’s inner working parts into one neat file that you can run on your computer. |
| Terminal | The terminal is a CLI for macOS computers that allows you to communicate directly with your computer. |
| Index | The index is a customer’s, commissions’, or iteration’s unique identifier. It is simply the number that appears next to the customer’s name, the commission’s title, or the iteration’s description. |
| Prefix | A ‘prefix’ is simply a single character with a forward slash (eg: “n/”, “p/”, “d/”) that lets ArtBuddy know what the piece of data you’ve passed into ArtBuddy is. With a prefix attached to each command parameter, ArtBuddy now understands whether a command parameter is a customer’s name, or a customer’s phone number. Neat right? |
| File path | A string of words that represents where a file in your computer is located. You may refer to Appendix: What are file paths and root directories? for a more detailed explanation. |
| Root directory | The mother of all folders in your computer. You can think of the root directory as the folder that stores all of the folders in your computer. |
FAQ
Q: Why does my command not work?
A: First make sure that you have written one of the available commands. Note that it is case-sensitive, which means
help works but Help does not.
If you have written the correct command word, but it still does not work, then an error displayed will show you the correct usage
or why your command is not working. Note that the prefixes are case-sensitive too. If you want to know more details about the command, please refer to that command in the Features section.
Q: How do I transfer my data to another Computer?
A: Install the app in the other computer and overwrite the default data folder it creates with the data folder that contains the data of your previous ArtBuddy home folder.
Q: Why isn't my file path being recognised by ArtBuddy?
A: If you're sure that the file exists, one common mistake new users may make is omitting the root directory from your file path. So do check that the file path you specified starts with a '/'. Please also make sure that your specified file path does not fall under the limitations of file paths in ArtBuddy mentioned in the Appendix: Limitations with file paths in CLI. If all else fails, you can try uploading the image via GUI instead!
Q: What makes two customers different when adding a customer by addcus?
A: We only check it by their name case-sensitive. That means you can have two customers with names "Sarah" and "sarah". If this is still not enough to distinguish your customers with same name, you can even include numbers in the name field like "Sarah 1", "Sarah 2". At the moment, we only support alphanumeric english characters with space for our early versions.
Q: What makes two commissions different when adding a commission by addcom?
A: We decided that to avoid confusion, for every customer the title of the commissions must be unique. Therefore, if the customer you want to add a commission to already has the same title commission it won't be allowed.
Q: What makes two iterations different when adding an iteration by additer?
A: We decided that for each commission the description of the iterations must be unique. Therefore, if the commission you want to add an iteration to already has the same description iteration it won't be allowed.
Q: Why am I allowed to insert more than 2 significant digits in commission fee?
A: Although our calculations are done in dollar amount, we don't expect you to make your deals in dollar. So you can write the fee value in dollars but with more significant digits for more accurate calculations. But in the GUI, for the ease of your eyes, we display it in 2 decimal digits only.
Q: Why am I allowed to insert dates that are in the past?
A: We expect that you've successfully had customers and commissions before using our application. We enabled adding past dates for archival purposes so that you can make the best out of our statistical features.
Q: Why is my new commission not in the commission list?
A: You might have accidentally filtered out your new commission with a prior
findcom command.
Try listcom to reset your commission search and see all your commissions!
Q: What are file paths and root directories?
A: We don't expect you to have a lot of technical knowledge about a computer file system. But we provide you a good explanation to answer your question in the Appendix.
Command summary
| Action | Format, Examples | |
|---|---|---|
| Open customer/Switch to Customer Tab |
opencus [INDEX]e.g., opencus 2, opencus
|
|
| Add customer |
addcus n/NAME p/PHONE_NUMBER e/EMAIL [a/ADDRESS] [t/TAG]... e.g., addcus n/John Doe p/98765432 e/johnd@example.com a/John street, block 123, #01-01 t/animal cartoons
|
|
| Edit customer |
editcus INDEX [n/NAME] [p/PHONE] [e/EMAIL] [a/ADDRESS] [t/TAG]... e.g., editcus 1 p/91234567 e/johndoe@example.com
|
|
| Delete customer |
delcus INDEXe.g., delcus 14
|
|
| Open Commission/Switch to Commission Tab |
opencom [INDEX]e.g., opencom 14, opencom
|
|
| Add commission |
addcom n/TITLE f/FEE d/DEADLINE [t/TAG]...e.g., addcom n/Rimuru f/40 d/2022-11-01 t/traditional t/chibi
|
|
| Edit commission |
editcom INDEX [n/TITLE] [f/FEE] [d/DEADLINE] [s/COMPLETION STATUS] [p/DESCRIPTION] [t/TAG]... e.g., editcom 1 n/Tokyo Ghoul Kaneki f/50 d/2022-10-10 s/False p/Unfamiliar, I will need to do up a reference board first. t/digital t/neon
|
|
| Delete Commission |
delcom INDEXe.g., delcom 14
|
|
| Add Iteration |
additer n/DESCRIPTION d/DATE f/FEEDBACK p/FILEPATHe.g., additer n/Draft 1 f/Good d/2022-10-28 p//Users/John/Downloads/Bread.jpeg
|
|
| Edit Iteration |
edititer INDEX [n/DESCRIPTION] [d/DATE] [f/FEEDBACK] [p/FILEPATH]e.g, edititer 2 n/Sketch
|
|
| Delete Iteration |
deliter INDEXe.g., deliter 1
|
|
| List customers | list |
|
| Find customers |
find [k/KEYWORD]... -all [t/TAG]... -any [t/TAG]... e.g. find -all t/friend t/colleague
|
|
| Sort customers |
sortcus PREFIX/SUFFIXe.g., sortcus n/+
|
|
| List commissions | listcom |
|
| View all Commissions | allcom |
|
| Find commissions | findcom [k/KEYWORD]... -all [t/TAG]... -any [t/TAG]... |
|
| Help | help |
|
| Clear everything | clear |
|
| Exit | exit |